Turborepo Guide EP1

What is Monorepo
Monorepo (Monolithic Repository) เป็นกลยุทธ์ในการจัดการซอร์สโค้ดแบบหนึ่งที่รวมโค้ดทั้งหมดของ project ไว้ในที่เดียว แทนที่จะแยกเป็นหลายๆ repository แยกกัน ลองนึกภาพว่าแทนที่จะมี repository แยกกันสำหรับแต่ละ apps หรือ libraries คุณจะมี repository เดียวที่เก็บโค้ดทั้งหมดไว้ด้วยกัน
องค์กรใหญ่ๆ อย่าง Google, Facebook, Microsoft และอีกหลายบริษัทใช้ Monorepo หรือเปล่าก็ไม่รู้ ผมไม่เคยทำงานที่นั่น ฮ่าๆ 😆😆😆 (แล้วจะยกมาเพื่อ? ฮ่าๆ)
Why do we need Monorepo
ทำไมถึงควรใช้ Monorepo? การใช้ Monorepo มีข้อดีหลายประการที่ช่วยให้การสร้าง software ง่ายขึ้น
- Share codes เมื่อทุกอย่างอยู่ในที่เดียวกัน การแชร์โค้ดระหว่างโปรเจกต์ทำได้สะดวกมาก ไม่ต้องผ่านระบบการจัดการแพคเกจที่ซับซ้อน ทีมสามารถสร้าง libraries แล้ว ใช้งานได้ทันทีในทุก apps
- Atomic Changes เมื่อต้องแก้ไขโค้ดที่มีผลกระทบต่อหลาย apps Monorepo ช่วยให้คุณทำการเปลี่ยนแปลงทั้งหมดใน commit เดียว ทำให้มั่นใจได้ว่าทุกอย่างยังทำงานร่วมกันได้อย่างถูกต้อง
Before start
ในบทความชุด ชุดนี้ เพื่อนๆจะไม่ได้แค่เรียนรู้การใช้งาน Turborepo เพียงอย่างเดียวนะครับ
สิ่งที่นอกเหนือจากการใช้ Turborepo ในสไตล์ผม ก็เช่น
- จะได้รู้วิธีการสร้าง libraries ใช้เอง,
- การ bundle libraries,
- export files ไปให้ apps หรือ packages อื่นๆเอาไปใช้งาน เราจะใส่ type อย่างไร,
- การ bundle แบบครบจบในไฟล์เดียวทำอย่างไร,
- การ setup eslint ที่จะใช้กับ Monorepo,
- ถ้าไม่อยากใช้ Turborepo ก็ยังจะไปใช้ Moonrepo ที่เป็น Monorepo managment แทนได้เลย ใช้วิธีการเหมือนกันเด๊ะๆ เขาเป็นคู่แข่งกัน (เอาจริงๆผมชอบ Moon มากกว่าด้วย แต่เขายังทำระบบ remote caching ไม่เสร็จ) ก็เลยเลือกใช้ Vercel Turborepo ไปก่อน
- การใช้ Dagger แบบนิดหน่อย
- การใช้ Github actions แบบนิดหน่อย ผมก็พึ่งเริ่มหัดใช้
- รู้จักวิธีใช้งาน rslib library เพื่อ build packages กับ apps ของเรา
บทความจะแบ่งเป็น 3 ep นะครับ
- EP1 จะเกี่ยวกับการสร้าง Turborepo ใส่ apps ต่างๆ ใส่ packages ต่างๆ
- EP2 จะสร้าง dockerfile สำหรับ apps ต่างๆของเรา โดยใช้ Dagger ดีไหมนะ
- EP3 จะสร้างตัวอย่าง pipeline สำหรับ CD ง่ายๆ (อาจจะเป็น Cloudbuild หรีือ Github actions เดี๋ยวดูก่อน ผมยังใหม่กับ Github actions น่ะครับ)
ก่อนจะไปเริ่ม ผมจะเล่าให้ฟังก่อนว่าจะพาทำอะไรบ้างใน blog นี้
ผมจะสร้าง Monorepo โดยใช้ Turborepo นะครับ โดยใช้
จริงๆถ้าเอาแค่ Monorepo จะใช้
แต่ผมจะไม่ได้ใช้ caching server ของ Vercel นะครับ ส่วน caching จะไม่ได้พูดถึงใน blog นี้นะครับ ถ้าใครสนใจก็บอกได้ เดี๋ยวผมเขียน blog ให้
ใน Monorepo ผมจะมี
apps
Backend จะใช้🔥 Hono Frontend จะใช้🌴 Tanstack start นะครับ ตรงนี้ต้อง note ไว้นะครับว่าTanstack start ยังเป็น Beta อยู่ และใน blog นี้ผมเน้นไปที่ Turborepo นะครับ ไม่ใช่ตัวของTanstack start
packages
ESLint config เราจะ setup eslint config ไว้ในที่เดียวตรง package นี้ ทำเป็น preset ไว้ เอาไว้ให้ apps กับ packages อื่นๆเรียกใช้ได้ง่ายๆ เพราะทุกๆ apps ทุกๆ packages เราก็มักจะใช้ config เดียวกัน ผมเขียน config เป็น.tsด้วยนะ
หลายคนอาจจะไม่เคยใช้.tsกับ eslint config เพราะมันต้องมีขั้นตอนเพิ่มเข้ามา แต่ก็นิดเดียวเองนะRslib config ผมจะใช้ Rslib ในการ build ทั้ง apps และ packages
ทำไมผมถึงเลือก Rslib เพราะว่ามันเร็ว ฮ่าๆ หรือเพื่อนๆจะใช้ตัวอื่นก็ได้นะ เช่น tsup, pkgroll วิธีการเหมือนกันเลย ทีแรกผมจะใช้ unbuild เพราะชอบที่เขาใช้ jiti แต่พึ่งเห็นว่าเขาจะ remove jiti ออกก็เลยเปลี่ยนดีกว่าPrisma เอา prisma มาสร้าง packages แล้วให้ Hono เรียกใช้ หรือถ้ามี Backend อีกตัวก็จะแชร์ prisma package ร่วมกัน แต่การที่ Backend 2 ตัวแชร์ Database ร่วมกันผมจะไม่พูดถึงนะครับ อย่างที่บอกว่าจะพาทำ TurorepoUI Components ผมจะเอา Shadcn components มาไว้ที่ Package แทน เผื่อว่ามี Frontend อีกตัวต้องการใช้ Components เหมือนกัน จะได้ไม่ต้องทำใหม่Hono App จริงๆผมจะเอา Hono app มาไว้ที่ Package นี่แหละ แต่เป็น Hono ที่ไม่ได้ start server เดี๋ยวจะให้ Hono ตัวที่เป็น App เป็นคน start server
ทำไมต้องเอา Hono app มาไว้ที่ Package ด้วย เหตุผลเดียวของผมคือ ผมอยากได้ E2E Type-safe คือจะให้ Frontend ดึง Type ที่ได้จาก Hono app ไปใช้งาน ทำให้ Frontend รู้ได้เลยว่า มี API Routes อะไรบ้าง ต้องส่ง request ยังไง และจะได้รับ Response อะไรบ้าง
global ผมมี setup สำหรับ ใช้กับภาพรวมของ Monorepo ด้วย
Git hooks using Husky จริงอยากใช้ Lefthook มากกว่า แต่มีน้องๆในทีมที่ใช้ Windows แล้วมันไม่ทำงาน ผมก็ไม่รู้จะแก้ยังไง ฮ่าๆGitmoji ก็จะใส่ emoji ใน git commit message ด้วยอะLintstage เราจะไม่ ตรวจสอบ lint กับทุกๆไฟล์ ตรวจเฉพาะไฟล์ที่แก้ไขไปก็พอ
Dockerfile ผมจะเขียน Dockerfile เป็นตัวอย่างให้ด้วย ส่วนนี้จะแยกเป็นอีก Blog นึงเป็น EP2 นะครับ
Dagger มันจะพิเศษตรงที่ผมจะใช้ Dagger นะครับDockerfile หรืออาจจะใช้แค่ Dockerfile
CICD Pipeline ผมจะเขียน CICD Pipeline เป็นตัวอย่างให้ด้วย ส่วนนี้ก็จแยกเป็นอีก Blog นึงเป็น EP3 นะครับ
Github actions ผมยังใหม่กับ Github actions ถ้าผิดพลาดยังไงรบกวนชี้แนะด้วยครับ
Init Turborepo
เริ่มสร้าง Turborepo project กันเลย
pnpm dlx create-turbo@latestเราจะได้ files & folders มาแบบนี้
.├── apps│ ├── docs # Nextjs│ └── web # Nextjs├── package.json├── packages│ ├── eslint-config│ ├── typescript-config│ └── ui├── pnpm-lock.yaml├── pnpm-workspace.yaml├── README.md└── turbo.jsonจะเห็นว่า ใน folder apps จะมี docs กับ web มาด้วย ซึ่งทั้่งคู่เป็น Nextjs ผมจะไม่ใช้ ดังนั้นผมจะลบมันทิ้งไปเลย
.├── apps│ ├── docs│ └── web├── package.json├── packages│ ├── eslint-config│ ├── typescript-config│ └── ui├── pnpm-lock.yaml├── pnpm-workspace.yaml├── README.md└── turbo.jsonturbo.json
มาดูไฟล์ turbo.json กันก่อนเลย
{ "$schema": "https://turbo.build/schema.json", "ui": "tui", "tasks": { "build": { "dependsOn": ["^build"], "inputs": ["$TURBO_DEFAULT$", ".env*"], "outputs": ["dist", ".next/**", "!.next/cache/**"] }, "lint": { "dependsOn": ["^lint"] }, "check-types": { "dependsOn": ["^check-types"] }, "dev": { "cache": false, "persistent": true } }}ผมเพิ่ม dist เข้าไป และเอา
-
$schemaแค่บอก IDE ว่า ไฟล์ json นี้มี config อะไรบ้าง มันจะมี auto complete มาช่วยเราด้วย -
uiมี value ได้ 2 แบบ-
streamด้วยความที่เราใช้ monorepo เรามักจะรันหลายๆ apps พร้อมๆกัน การใช้streamจะเป็นการบอกให้ Turborepo เอาสิ่งที่ apps พ่นลง console มากองรวมกันใน Terminal อันเดียว ใครพ่นอะไรมาเวลาไหนมันจะเรียงลำดับให้เลยตามเวลาก่อนหลัง
-
tuiแทนที่จะพ่นทุกอย่างจากทุก apps มาใน Terminal ตัวเดียวกัน Turborepo จะมีหน้าต่างแยกเป็นราย app เลย เราก็กดลูกศรเลือกเอาว่าอยากดู console ของ app ไหน
-
-
tasksอันนี้จะมีรายละเอียดเยอะหน่อยbuildlintcheck-typesdev
ทั้ง 4 ตัว คือชื่อของ tasks เราสามารถตั้งชื่อเองได้เลย มันจะเป็นคำสั่งที่เราจต้องไปใช้คู่กับคำสั่ง pnpm turbo run <task's name>
และชื่อ tasks นี้จะต้องตรงกับชื่อคำสั่ง scripts ที่อยู่ใน pnpm turbo run dev ตัว Turborepo จะไปไล่ดูว่ามี apps หรือ packages ไหนบ้าง ที่มีคำสั่ง dev อยู่ใน
ถัดมา มาดู properties ของ task แต่ละตัวกัน
dependsOnตัวอย่างเช่นdependsOn: ["^build"]อันนี้เป็นการบอก turborepo ว่า ถ้าก่อนที่จะทำงาน taskbuild (ชื่อ task นี้) ให้ไปดูว่า packages ไหน apps ไหนต้องรันก่อนหลังแล้ว turbo จะเรียงการทำงานตามลำดับให้ ให้สังเกตว่าจะมีเครื่องหมาย^อยู่ด้านหน้าด้วย ส่วนแบบไม่มีเครื่องหมาย หรือเครื่องหมายอื่นๆ ผมไม่ได้ใช้เลยinputsคือไฟล์และรูปแบบที่ Turborepo จับตาดูเพื่อพิจารณาว่าจำเป็นต้องรัน task ซ้ำหรือไม่ ตัวอย่างเช่น task ชื่อ “build” มี “inputs”: [“$TURBO_DEFAULT$”, “.env*”] นั่นหมายความว่า task “build” จะดูที่ไฟล์.env*(ชื่อไฟล์ที่ขึ้นต้นด้วย .env ตามด้วยคำว่าอะไรก็ได้) ถ้ามีการเปลี่ยนแปลงก็จะทำ task build ใหม่outputsบอก Turborepo ว่าให้เก็บ cache ที่ files ไหน folders ไหน สามารถใส่เครื่องหมาย!เพื่อบอกว่าห้ามเก็บ cache ที่ files นี้ folders นั้นcacheบอกว่าต้องเก็บ cache ไหม เรามักจะใช้กับ task “dev” นี่แหละเพราะว่ามันไม่ได้ generate อะไร แค่ start server แล้วทำงานไปยาวๆpersistentมักจะใส่ใน task “dev” เพื่อบอก Turborepo ว่า task “dev” จะทำงานไปยาวๆเลย ไม่ต้องรอคำสั่งให้ทำงานเสร็จ ไปทำ task “dev” ของ apps หรือ packages อื่นๆได้เลย
Setup Eslint
การ setup ESLint ใน Turborepo ผมเสียเวลากับมันนานมาก สุดท้ายก็มาเป็นท่าที่พาเพื่อนๆทำนี่แหละ
ตอนนี้ก็ยังไม่แน่ใจว่ามันโอเคจริงๆใช่ไหม แต่มัน Work กับผมละนะ
มาเริ่มกันเลย
Install Eslint at the workspace level
ที่ workspace level นะ install ด้วยคำสั่ง
pnpm add -w -D eslint jitiผมใส่ jiti ด้วยเพื่อที่จะได้ใช้ .ts กับ eslint config ได้
ที่ package.json ด้านนอกสุด จะมี devDependencies แบบนี้
{ "name": "blog", "private": true, "type": "module", "scripts": { "build": "turbo run build", "dev": "turbo run dev", "lint": "turbo run lint", "format": "prettier --write \"**/*.{ts,tsx,md}\"", "check-types": "turbo run check-types" }, "devDependencies": { "eslint": "^9.20.1", "jiti": "^2.4.2", "prettier": "^3.5.0", "turbo": "^2.4.4", "typescript": "5.7.3" }, "packageManager": "pnpm@10.5.2", "engines": { "node": ">=18" }}Init via Antfu’s eslint
เราจะสร้าง eslint config ไว้ใน packages แล้ว shared ไปที่ apps และ packages ต่างๆ เผื่อว่าในแต่ละ apps หรือ packages ต้องการ config ไม่เหมือนกัน
เรามี folder packages/eslint-config อยู่แล้ว
.├── apps├── eslint.config.mjs├── mise.toml├── package.json├── packages│ ├── eslint-config│ │ ├── base.js│ │ ├── next.js│ │ ├── package.json│ │ ├── react-internal.js│ │ └── README.md│ ├── typescript-config│ └── ui├── pnpm-lock.yaml├── pnpm-workspace.yaml├── README.md└── turbo.jsonให้ cd เข้ามาที่ folder packages/eslint-config
cd packages/eslint-configpnpm dlx @antfu/eslint-config@latestเลือกตามนี้เลย
┌ @antfu/eslint-config v4.3.0│◇ There are uncommitted changes in the current repository, are you sure to continue?│ Yes│◇ Select a framework:│ React│◇ Select a extra utils:│ Formatter│◇ Update .vscode/settings.json for better VS Code experience?│ Yes│◇ Bumping @antfu/eslint-config to v4.3.0│◇ Added packages ────────────────────────────────────────────────────────────────────────────────────────────╮│ ││ eslint-plugin-format, @eslint-react/eslint-plugin, eslint-plugin-react-hooks, eslint-plugin-react-refresh ││ │├─────────────────────────────────────────────────────────────────────────────────────────────────────────────╯│◆ Changes wrote to package.json│◆ Created eslint.config.mjs│◆ Updated .vscode/settings.json│◆ Setup completed│└ Now you can update the dependencies by run pnpm install and run eslint . --fixInstall ESLint and it’s dependencies
pnpm add -D eslint-plugin-perfectionist eslint-plugin-oxlint jiti -wใน package.json จะมี dependencies แบบนี้
eslint-config/package.json
{ "name": "@repo/eslint-config", "version": "0.0.0", "type": "module", "private": true, "exports": { "./base": "./base.js", "./next-js": "./next.js", "./react-internal": "./react-internal.js" }, "devDependencies": { "@eslint/js": "^9.21.0", "@next/eslint-plugin-next": "^15.1.6", "eslint": "^9.21.0", "eslint-config-prettier": "^10.0.1", "eslint-plugin-only-warn": "^1.1.0", "eslint-plugin-react": "^7.37.4", "eslint-plugin-react-hooks": "^5.1.0", "eslint-plugin-turbo": "^2.4.0", "globals": "^15.15.0", "typescript": "^5.7.3", "typescript-eslint": "^8.24.0", "@antfu/eslint-config": "^4.3.0", "@eslint-react/eslint-plugin": "^1.26.2", "eslint-plugin-format": "^1.0.1", "eslint-plugin-oxlint": "^0.15.12", "eslint-plugin-perfectionist": "^4.9.0", "eslint-plugin-react-refresh": "^0.4.19", "jiti": "^2.4.2" }}แล้วก็ set type=module แบบนี้
จริงๆเขา set มาให้แล้ว แต่ก็เผื่อไว้ละกัน
pnpm pkg set type=modulecreate new eslit config
เราจะสร้าง eslint config แบบของเรา (ของผมคนเดียว เพื่อนๆก็ปรับเอาตามชอบนะครับ)
สร้าง file antfu.ts กับ eslint.config.ts
touch antfu.tstouch eslint.config.tsจะได้แบบนี้
.├── eslint-config│ ├── antfu.ts│ ├── base.js│ ├── eslint.config.ts│ ├── next.js│ ├── package.json│ ├── react-internal.js│ └── README.mdfile antfu.ts จะเป็น file ที่เก็บ config ของเรา
ส่วน eslint.config.ts อันนี้จะเป็น file ที่เอาไว้บอก ESLint lsp ว่าเรา config อะไรบ้าง โดยจะมีผลแค่ใน package eslint-config นี้เท่านั้น
antfu.ts
import antfu from "@antfu/eslint-config"import oxlint from "eslint-plugin-oxlint"import perfectionist from "eslint-plugin-perfectionist"
const antfuConfig = antfu( { formatters: true, react: true, stylistic: { indent: 2, quotes: "double", semi: false, }, typescript: true, }, { plugins: [ perfectionist.configs["recommended-alphabetical"], oxlint.configs["flat/all"], ], rules: { "no-console": "warn", "perfectionist/sort-objects": "error", "react/no-nested-components": "off", "ts/consistent-type-definitions": "off", "unicorn/throw-new-error": "off", "unused-imports/no-unused-imports": "error", }, }, { ignores: [ "**/*.json", ], },)
/** @type {import("eslint").Linter.Config} */export default antfuConfigส่วน eslint.config.ts เราก็แค่ import มาจาก antfu.ts
eslint.config.ts
import antfu from "./antfu"
export default antfuexport antfu.ts
เราจะต้อง export antfu.ts ที่เราสร้างไว้ เพื่อให้ apps หรือ packages อื่นๆเอาไปใช้ได้
ตรงนี้ไม่ใช่แค่ keyword export ในไฟล์นะครับ
เป็นการ export แบบที่ npm library จะต้องทำ
ยังอยู่ใน packages/eslint-config นะครับ
มาที่ package.json
eslint-config/package.json
{ "name": "@repo/eslint-config", "version": "0.0.0", "type": "module", "private": true, "exports": { "./base": "./base.js", "./next-js": "./next.js", "./react-internal": "./react-internal.js", "./antfu": { "default": "./antfu.ts", "types": "./antfu.ts" } }, "devDependencies": { ... }}use eslint config from antfu config in another package
setup ESLint ได้แล้ว เราลองเอาไปใช้ใน packages หรือ apps อื่นๆดู
ตอนนี้เรายังไม่ได้สร้าง apps หรือ packages เลย
แต่มี package ui ที่ติดมากับ Turborepo เราจะลองเอาไปใช้ในนี้ละ
แก้ไฟล์ eslint.config.mjs ให้เป็น eslint.config.ts
└── ui ├── eslint.config.ts ├── eslint.config.mjs ├── package.json ├── src ├── tsconfig.json └── turboเราก็ต้อง install eslint-config ที่เราสร้างเองด้วย
โดยชื่อที่จะใช้ install จะไม่ใช่ชื่อ folder นะครับ
จะต้องเป็น name ที่อยู่ใน package.json ใน folder ของ eslint-config
ในที่นี้คือ @repo/eslint-config นั่นเอง
eslint-config/package.json
{ "name": "@repo/eslint-config",3 collapsed lines
"version": "0.0.0", "type": "module", "private": true, "exports": { "./base": "./base.js", "./next-js": "./next.js", "./react-internal": "./react-internal.js", "./antfu": { "default": "./antfu.ts", "types": "./antfu.ts" } },17 collapsed lines
"devDependencies": { "@antfu/eslint-config": "^4.4.0", "@eslint-react/eslint-plugin": "^1.30.0", "@eslint/js": "^9.21.0", "@next/eslint-plugin-next": "^15.2.1", "eslint": "^9.21.0", "eslint-config-prettier": "^10.0.2", "eslint-plugin-format": "^1.0.1", "eslint-plugin-only-warn": "^1.1.0", "eslint-plugin-react": "^7.37.4", "eslint-plugin-react-hooks": "^5.2.0", "eslint-plugin-react-refresh": "^0.4.19", "eslint-plugin-turbo": "^2.4.4", "globals": "^16.0.0", "typescript": "^5.8.2", "typescript-eslint": "^8.26.0" }}มาที่ packages/ui ไฟล์ package.json ให้เพิ่ม internal dependencies แบบนี้
ui/package.json
{ "name": "@repo/ui", "version": "0.0.0", "private": true, "exports": { "./*": "./src/*.tsx" }, "scripts": { "lint": "eslint . --max-warnings 0", "generate:component": "turbo gen react-component", "check-types": "tsc --noEmit" }, "dependencies": { "react": "^19.0.0", "react-dom": "^19.0.0" }, "devDependencies": { "@repo/eslint-config": "workspace:*", "@repo/typescript-config": "workspace:*", "@turbo/gen": "^2.4.0", "@types/node": "^22.13.0", "@types/react": "19.0.8", "@types/react-dom": "19.0.3", "eslint": "^9.21.0", "typescript": "5.7.3" }}เราใส่ "@repo/eslint-config": "workspace:*" เข้าไปที่ devDependencies นะครับ
ด้านหลังที่เป็น workspace:* หมายถึงว่า package นี้อยู่ใน workspace นี้ ไม่ต้องไป download จาก npm registry
เสร็จแล้วก็สั่ง
pnpm iจากนั้นมาแก้ file eslint.config.ts
ui/eslint.config.ts
import config from "@repo/eslint-config/antfu"
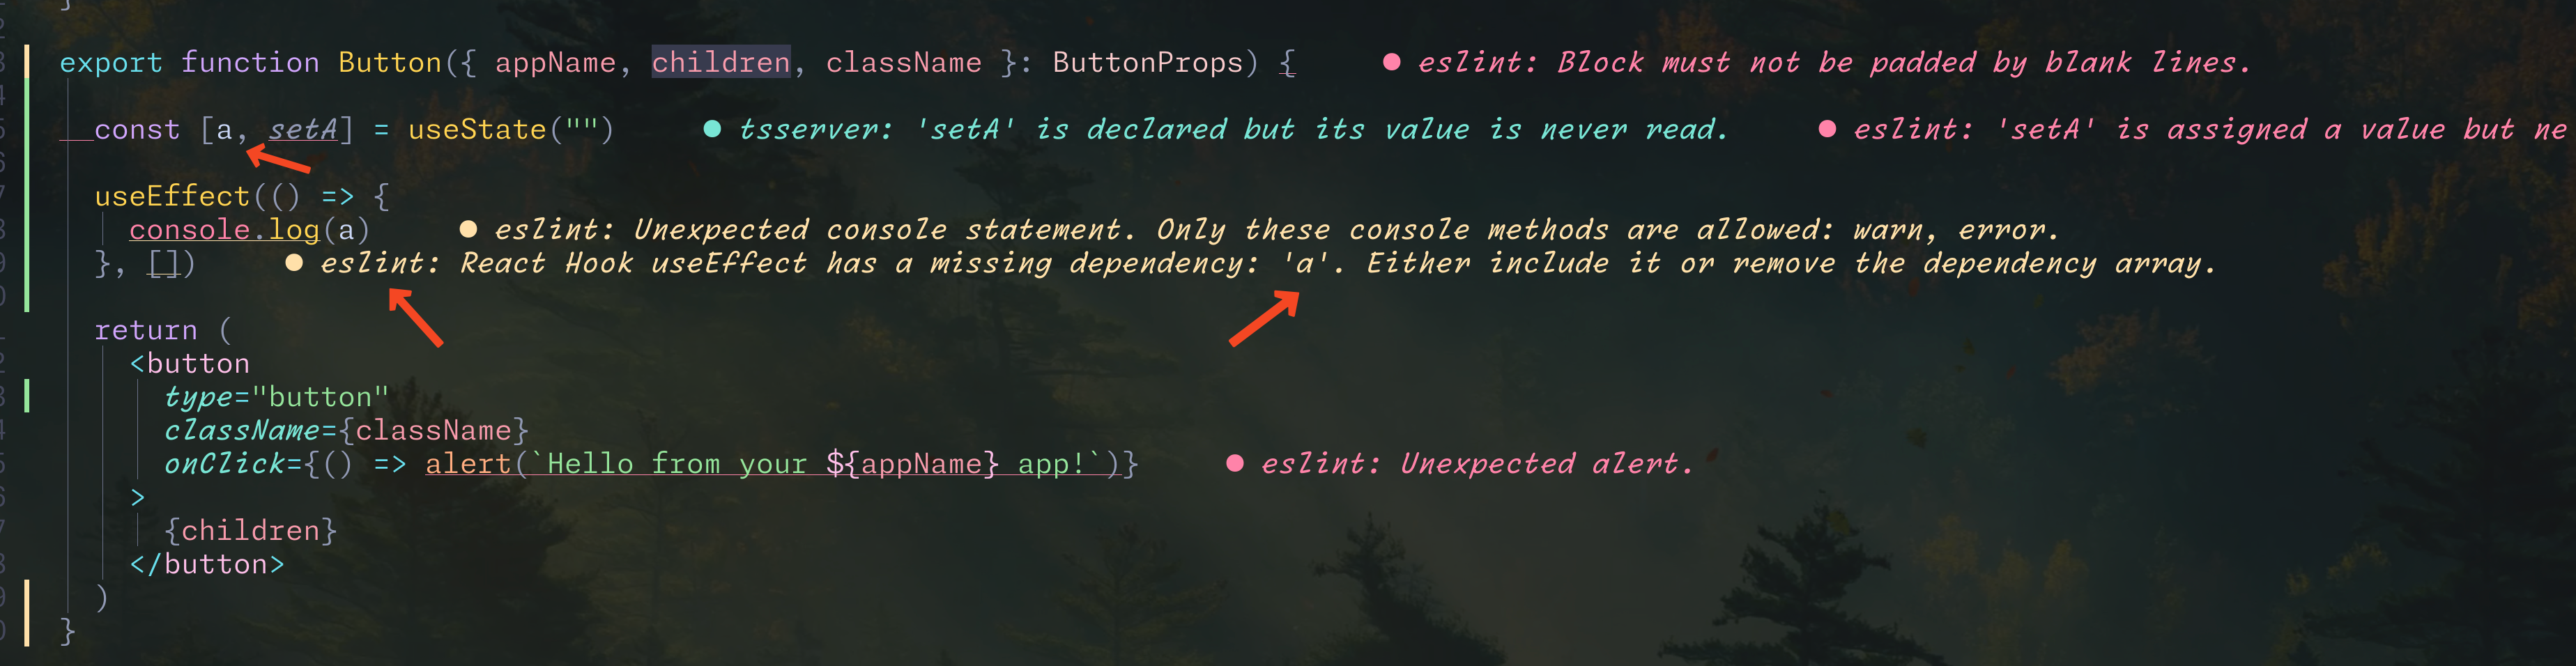
/** @type {import("eslint").Linter.Config} */export default configเสร็จแล้วผมจะทดสอบที่ useEffect ดูว่ามี eslint เตือนหรือเปล่า
โดยสร้าง useState แล้วเอามาใช้ใน useEffect
ลองที่ component ไหนก็ได้ ผมจะลองที่ file button.tsx
.├── eslint-config├── typescript-config└── ui ├── eslint.config.ts ├── package.json ├── src │ ├── button.tsx │ ├── card.tsx │ └── code.tsx ├── tsconfig.json └── turboจะได้แบบนี้
ต่อไปเราจะเริ่มสร้าง Package ใช้เองกันแล้ว เริ่มที่ Prisma ก่อนเลย
Prisma Package - 1
create prisma package
เราจะมาสร้าง package ของเราเอง เริ่มด้วย Prisma เลย
เราสร้าง folder prisma ใน folder packages
mkdir packages/prismaจากนั้นให้ cd เข้าไปที่ folder prisma เพื่อความสะดวกในการ install setup package ต่างๆ ในระหว่างที่เราสร้าง prisma package
cd packages/prismacreate package.json
แล้วสั่ง
pnpm initจะได้ file package.json แบบนี้
prisma/package.json
{ "name": "prisma", "version": "1.0.0", "description": "", "main": "index.js", "scripts": { "test": "echo \"Error: no test specified\" && exit 1" }, "keywords": [], "author": "", "license": "ISC", "packageManager": "pnpm@10.5.2"}เราจะแก้ name ให้เป็น @repo/prisma
ใส่ "type": "module"
เอา main ออกไปเลย
ด้วยคำสั่ง
pnpm pkg set type=modulepnpm pkg set name=@repo/prismapnpm pkg delete mainหรือถ้าใครจะทำด้วยการแก้ package.json ตรงๆก็ได้เช่นกัน
prisma/package.json
{ "name": "prisma", "name": "@repo/prisma", "version": "1.0.0", "description": "", "type": "module", "main": "index.js", "scripts": { "test": "echo \"Error: no test specified\" && exit 1" }, "keywords": [], "author": "", "license": "ISC", "packageManager": "pnpm@10.5.2"}setup eslint config for prisma
ใส่ eslint config package ของเรา แบบนี้
pnpm pkg set 'devDependencies.@repo/eslint-config=workspace:*'prisma/package.json
{ "name": "@repo/prisma", "version": "1.0.0", "description": "", "main": "index.js", "scripts": { "test": "echo \"Error: no test specified\" && exit 1" }, "keywords": [], "author": "", "license": "ISC", "devDependencies": { "@repo/eslint-config": "workspace:*" }, "packageManager": "pnpm@10.5.2"}prisma/eslint.config.ts
สร้าง eslint config file
echo 'import antfu from "@repo/eslint-config/antfu"
    export default antfu' > eslint.config.ts
จะได้แบบนี้
หรือเพื่อนๆจะสร้างไฟล์แล้วแล้วก๊อปวางก็ได้ แล้วแต่สะดวกเลยครับ
import antfu from "@repo/eslint-config/antfu"
export default antfusetup typescript config
ผมจะไม่ได้ใช้ package typescript-config ที่ turborepo เตรียมมาให้นะครับ
ผมจะใช้ lib ของคุณ Matt Pocock นะครับ เขาเตรียม config ที่ควรใช้มาให้เราแล้ว
pnpm add -D @total-typescript/tsconfigแล้วก็สั่งคำสั่งนี้ เพื่อสร้าง file tsconfig.json แล้วใช้ config ของ total-typescript
echo '{ "extends": "@total-typescript/tsconfig/bundler/dom/app" } ' > tsconfig.jsonหรือใครจะสร้างไฟล์ tsconfig.json ขึ้นมาแล้วเอา config ไปใส่ ก็ได้ สุดท้ายเราจะได้ tsconfig.json แบบนี้
tsconfig.json
{ "extends": "@total-typescript/tsconfig/bundler/dom/app"}install and init prisma
pnpm add prisma @prisma/clientpnpm prisma init --datasource-provider postgresqlเราก็จะได้ folder prisma เพิ่มมาแบบนี้
.├── eslint.config.ts├── package.json└── prisma └── schema.prismaที่ไฟล์ schema.prisma
ผมเพิ่ม model user ไปแบบนี้
generator client { provider = "prisma-client-js"}
datasource db { provider = "postgresql" url = env("DATABASE_URL")}
model User { id Int @id @default(autoincrement()) name String}แล้วก็สั่ง
pnpm prisma generateจะได้ประมาณนี้
❯ pnpm prisma generateEnvironment variables loaded from .envPrisma schema loaded from prisma/schema.prisma
✔ Installed the @prisma/client and prisma packages in your project
✔ Generated Prisma Client (v6.4.1) to ./../../node_modules/.pnpm/@prisma+client@6.4.1_prisma@6.4.1_typescript@5.7.3__typescript@5.7.3/node_modules/@prisma/client in 40ms
Start by importing your Prisma Client (See: https://pris.ly/d/importing-client)
Tip: Curious about the SQL queries Prisma ORM generates? Optimize helps you enhance your visibility: https://pris.ly/tip-2-optimize
export prisma client
ถัดมาเราจะสร้าง prisma client แล้ว export ไปให้คนอื่นเรียกใช้งาน ผ่าน package prisma ของเราอันนี้
สร้าง file src/index.ts
mkdir srctouch src/index.tsในไฟล์มีแค่นี้เลย
src/index.ts
import { PrismaClient } from "@prisma/client"
export const prismaClient = new PrismaClient()แต่ๆ ถ้าใครจำได้ export แค่ตรงนี้ยังไม่พอที่จะให้ apps หรือ packages อื่นๆใน Turborepo เอาไปใช้งานได้
เราจะต้อง exports ที่ package.json ด้วย แต่ก่อนจะ exports ได้ต้อง compile มันซะก่อน
compile package using Rslib
เราใช้ typescript เขียน package prisma อันนี้รู้กันอยู่แล้ว
ก่อนที่เราจะให้ apps หรือ packages อื่นๆเรียกใช้ได้ เราต้อง compile ซะก่อน แล้วค่อย export สิ่งที่ได้จากการ compile ออกไป
เราจะต้อง compile prisma package ซะก่อน
เราจะใช้ Rslib ในการ compile นะครับ
การ compile เรามีเงื่อนไขหลายอย่าง Rslib ก็รองรับเงื่อนไขต่างๆหลายรูปแบบเลย การที่จะใช้คำสั่งเดียวยาวๆเพื่อใส่เงื่อนไขของเราทั้งหมดมันก็จะยาวไป
เราจะใช้ config file แทน เพื่อให้ง่ายต่อการ setup เงื่อนไขของเรา รวมถึงลดความผิดพลาดในการพิมพ์คำสั่งด้วยมือแล้วพิมพ์ผิด ตกหล่น
ฉนั้นสำหรับ Prisma package เราจะหยุดไว้ก่อน เราจะไปสร้าง rslib-config package กันก่อน เสร็จแล้วจะกลับมาทำ prisma package กันต่อ
rslib-config package
ใน terminal ใครยังอยู่ที่ package prisma ให้ cd กลับมาที่ workspace ก่อนนะครับ
cd ../..สร้าง folder rslib-config
mkdir packages/rslib-configจะได้แบบนี้
packages├── eslint-config├── prisma├── typescript-config├── ui└── rslib-configแล้ว cd เข้าไป
cd packages/rslib-configcreate package.json
สร้าง package.json
รอบนี้ผมใช้การ echo แทน ใครจะใช้ pnpm init ก็ได้ครับ
pnpm initpnpm pkg set 'name=@repo/rslib-config'pnpm pkg set 'type=module'pnpm pkg delete mainpnpm pkg set 'devDependencies.@repo/eslint-config=workspace:*'pnpm pkg set 'version=0.0.0'pnpm pkg set 'description=rslib config package' echo '{ "name": "@repo/rslib-config", "version": "0.0.0", "description": "rslib config package", "scripts": { "test": "echo \"Error: no test specified\" && exit 1" }, "keywords": [], "author": "", "license": "ISC", "devDependencies": { "@repo/eslint-config": "workspace:*" } } ' > package.jsonจากนั้นก็สั่ง
pnpm add @rslib/core -Dจะได้แบบนี้
{ "name": "@repo/rslib-config",7 collapsed lines
"version": "0.0.0", "description": "rslib config package", "scripts": { "test": "echo \"Error: no test specified\" && exit 1" }, "keywords": [], "author": "", "license": "ISC", "devDependencies": { "@repo/eslint-config": "workspace:*", "@rslib/core": "^0.5.3" }}create rslib config
สร้าง rslib config กัน
ผมจะมี config แยกกันระหว่าง packages กับ apps นะครับ
เนื่องจากว่าส่วนของ app อยากให้เล็กที่สุดและส่วนของ lib จะต้องสร้าง typescript declaration file ด้วย
build config for packages
มาสร้าง build config สำหรับ packages กันก่อน
สร้าง file lib.config.ts
lib.config.ts
import { defineConfig } from "@rslib/core"
export default defineConfig({ lib: [ { bundle: true, dts: true, format: "esm", output: { distPath: { root: "./dist/esm", }, minify: true, sourceMap: true, target: "web", }, }, { bundle: true, dts: true, format: "cjs", output: { distPath: { root: "./dist/cjs", }, minify: true, sourceMap: true, target: "web", }, }, ],})มาดูว่าเรา config อะไรไปบ้าง
bundle: trueอันนี้เพื่อนๆเลือกเอาได้เลยว่าจะให้ bundle ทุกๆไฟล์ให้มาอยู่ในไฟล์เดียวกันไหมdts: trueคือให้สร้าง declaration typescript file ให้ด้วย คือเราจะได้ไฟล์.d.tsมาด้วย เพื่อให้ app ที่เอา package ไปใช้รู้ได้ว่า type คืออะไรformat: "esm" หรือ "cjs"คือให้สร้างไฟล์ที่ได้มาใน format อะไร ถ้าเป็น esm ก็เป็น js สมัยใหม่จะใช้import,exportส่วน cjs ก็จะเป็น js แบบเก่าหน่อย ผมไม่ได้ใช้แบบนี้เท่าไรเลย ไม่ได้ใช้มานานแล้วด้วยoutputdistPathคือจะให้เอาไฟล์ที่ compile มาแล้วไปไว้ที่ไหนtarget: "web" | "node"ก็ขึ้นอยู่ว่าเราจะเอาไฟล์ที่ได้ไปใช้ที่ไหนsourcemapเอา sourcemap ด้วยminifyคือต้องการให้ทำให้ไฟล์ที่ได้มีขนาดเล็กไหม ถ้าต้องการตัวแปรต่างๆขอเราจะถูกเปลี่ยนชื่อให้มันสั้นๆโดยที่การทำงายยังเหมือนเดิม แค่ชื่อตัวแปรมันไม่สื่อว่าคืออะไร
build config for apps
สร้าง file app.config.ts`
app.config.ts
import { defineConfig } from "@rslib/core"
export default defineConfig({ lib: [ { bundle: true, dts: false, format: "esm", output: { distPath: { root: "./dist/esm", }, minify: true, sourceMap: true, target: "web", }, }, ],})ในส่วนของ app ผมต้องการแค่ esm และไม่ได้ต้องการ type declaration .d.ts แล้ว
export both configs
เรามา export ทั้งสอง configs ออกไปให้ packages หรือ apps ใช้กัน
เราจะต้อง exports ที่ package.json
pnpm pkg set 'exports[./lib]=./lib.config.ts'pnpm pkg set 'exports[./app]=./app.config.ts'จะได้ แบบนี้
rslib-config/package.json
{ "name": "@repo/rslib-config", "version": "0.0.0", "description": "rslib config package", "scripts": { "test": "echo \"Error: no test specified\" && exit 1" }, "keywords": [], "author": "", "license": "ISC", "devDependencies": { "@repo/eslint-config": "workspace:*", "@rslib/core": "^0.5.3" }, "exports": { "./lib": "./lib.config.ts", "./app": "./app.config.ts" }}Prisma Package - 2
กลับมาที่ Prisma package กัน รอบนี้เราจะใช้ build config ที่ได้สร้างไว้ใน rslib-config เมื่อกี้นี้
cd into prisma package
cd packages/prismainstall @rslib/core package
ติดตั้ง @rslib/core package กันก่อน
pnpm add -D @rslib/coreadd scripts, internal packages and exports in package.json
ต่อมาก็แก้ package.json เพิ่ม @repo/rslib-config เข้าไปแบบนี้
pnpm pkg set 'devDependencies.@repo/rslib-config=workspace:*'pnpm pkg set 'scripts.build=rslib build'pnpm pkg set 'scripts.dev=rslib build --watch'pnpm pkg set 'scripts.check=tsc --noEmit'pnpm pkg set 'exports[.].import.types=./dist/esm/src/index.d.ts'pnpm pkg set 'exports[.].import.default=./dist/esm/index.js'pnpm pkg set 'exports[.].require.types=./dist/cjs/src/index.d.ts'pnpm pkg set 'exports[.].require.default=./dist/cjs/index.cjs'- เพิ่ม
devDependenciesที่ชื่อว่า@repo/rslib-config: workspace:* - เพิ่ม scripts 3 ตัว
buildก็สั่งrslib buildเฉยๆ เดี๋ยว rslib มันจะไปอ่าน filerslib.config.tsแล้ว build ให้เราเองdevสั่งrslib build --watchก็สั่งให้ watch ด้วยเมื่อไฟล์มีการเปลี่ยนแปลง rslib ก็จะ build ให้เราใหม่
- เพิ่ม
exportsโดยตรงนี้ก็เหมือนกับที่เราทำใน eslint-config หรือ unbuild-config แต่จะละเอียดกว่าimportก็คือ javascript แบบ ESMrequireก็คือ javascript แบบ Commonjs
prisma/package.json
{ "name": "@repo/prisma",2 collapsed lines
"version": "0.0.0", "description": "", "scripts": { "build": "rslib build", "dev": "rslib build --watch", "check": "tsc --noEmit"4 collapsed lines
}, "keywords": [], "author": "", "license": "ISC", "type": "module", "devDependencies": { "@repo/eslint-config": "workspace:*", "@repo/rslib-config": "workspace:*", "@rslib/core": "^0.5.3", "@total-typescript/tsconfig": "^1.0.4"4 collapsed lines
"typescript": "^5.8.2" }, "dependencies": { "@prisma/client": "^6.4.1", "prisma": "^6.4.1" }, "exports": { ".": { "import": { "types": "./dist/esm/src/index.d.ts", "default": "./dist/esm/index.js" }, "require": { "types": "./dist/cjs/src/index.d.ts", "default": "./dist/cjs/index.cjs" } } }}add more taks to turbo.json
พอเรามี app ตอนที่เรานั่งโค้ดเราก็จะสั่ง run dev เป็นปกติกันอยู่แล้วใช่มะ
แต่ว่าตอนนี้เราใช้ Monorepo แยกการทำงานบางอย่างมาไว้ใน packages แล้วแชร์กันในหลายๆ apps ใน packages เราก็ต้องสั่ง run dev เช่นกัน
สุดท้ายตอนที่เรานั่งโค้ดเราก็แค่สั่ง pnpm turbo run dev ก็พอแล้ว
ดังนั้นผมจะเพิ่มคำสั่งนี้ ในไฟล์ turbo.json ด้วย
turbo.json
{ "$schema": "https://turbo.build/schema.json", "ui": "tui", "tasks": {23 collapsed lines
"build": { "dependsOn": [ "^build" ], "inputs": [ "$TURBO_DEFAULT$", ".env*" ], "outputs": [ ".next/**", "!.next/cache/**" ] }, "lint": { "dependsOn": [ "^lint" ] }, "check-types": { "dependsOn": [ "^check-types" ] }, "dev": { "cache": false, "persistent": true } }}จากนั้นออกมาที่ package.json ของ workspace
cd ../..เราจะเพิ่ม script dev ใน
pnpm pkg set 'scripts.dev=turbo run dev'จะได้ แบบนี้
{ "name": "blog", "private": true, "scripts": { "build": "turbo run build", "lint": "turbo run lint", "format": "prettier --write \"**/*.{ts,tsx,md}\"", "check-types": "turbo run check-types", "dev": "turbo run dev" }, "devDependencies": { "eslint": "^9.21.0", "eslint-plugin-oxlint": "^0.15.13", "eslint-plugin-perfectionist": "^4.9.0", "jiti": "^2.4.2", "prettier": "^3.5.3", "turbo": "^2.4.4", "typescript": "5.8.2" }, "packageManager": "pnpm@9.0.0", "engines": { "node": ">=18" }}create rslib.config.ts
สร้างไฟล์ rslib.config.ts พร้อมกับ import, export config ใน command เดียว ใครสะดวกเขียนเองก็ได้นะครับ
echo 'import config from "@repo/rslib-config/lib"
export default config' > rslib.config.ts
จะได้ไฟล์ rslib.config.ts แบบนี้
rslib.config.ts
import config from "@repo/rslib-config/lib"
export default configbuild prisma package
ลองสั่ง build ดู
pnpm buildน่าจะต้องได้อะไรประมาณนี้
❯ pnpm build
> @repo/prisma@0.0.0 build /Users/atiwatseenark/Documents/learn/turborepo/blog/packages/prisma
  File (cjs)            Size      Gzip  dist/cjs/index.cjs    1.2 kB
  -----
  File (esm)           Size       Gzip  dist/esm/index.js    0.12 kB    0.12 kB
เราจะได้ folder dist เพิ่มมา มีไฟล์แบบนี้
dist├── cjs│ ├── eslint.config.d.ts│ ├── index.cjs│ ├── index.cjs.map│ ├── rslib.config.d.ts│ └── src└── esm ├── eslint.config.d.ts ├── index.js ├── index.js.map ├── rslib.config.d.ts └── srcของด้านใน folder dist นี้แหละ ที่เราใส่ใน exports ที่
ตอนนี้ Prisma package ของเราพร้อมใช้งานแล้ว เราไปสร้าง Backend แล้วลองเรียใช้ Prisma package กัน
Create Hono app
เข้าไปที่ folder apps
จาก workspace root ก็ให้สั่ง
cd appsจากนั้นก็สร้าง hono app ด้วยคำสั่งที่ผมไป copy มาจากหน้าเวป hono
pnpm create hono@latestแล้วก็เลือกตามนี้
❯ pnpm create hono@latestcreate-hono version 0.15.3? Target directory ./api? Which template do you want to use? nodejs? Do you want to install project dependencies? yes? Which package manager do you want to use? pnpm✔ Cloning the template✔ Installing project dependencies🎉 Copied project filesGet started with: cd ./apiเราจะได้ files มาแบบนี้
apps└── api ├── package.json ├── README.md ├── src └── tsconfig.jsonadd rslib package
จากนั้นก็เพิ่ม package rslib เพื่อเอาไว้ build app แบบนี้
pnpm add -D @rslib/core @total-typescript/tsconfigupdate tsconfig.json
ใช้คำสั่งนี้หรือ copy code ด้านล่างก็ได้
echo '{ "extends": "@total-typescript/tsconfig/bundler/dom/app", "compilerOptions": { "verbatimModuleSyntax": true, "types": [ "node" ], "jsx": "react-jsx", "jsxImportSource": "hono/jsx", } } ' > tsconfig.jsonจะได้ tsconfig แบบนี้
tsconfig.json
{ "extends": "@total-typescript/tsconfig/bundler/dom/app", "compilerOptions": { "verbatimModuleSyntax": true, "types": [ "node" ], "jsx": "react-jsx", "jsxImportSource": "hono/jsx", }}update package.json
pnpm pkg set type=modulepnpm pkg set 'devDependencies.@repo/eslint-config=workspace:*'pnpm pkg set 'devDependencies.@repo/rslib-config=workspace:*'pnpm pkg set 'dependencies.@repo/prisma=workspace:*'pnpm pkg set 'scripts.build=rslib build'pnpm pkg set 'scripts.dev=tsx watch --include \'../../packages/*/dist/**/*.js\' src/index.ts'pnpm pkg set 'scripts.start=node ./dist/esm/index.js'ที่ script dev ผมจะใส่ option --include ไปที่ tsx ด้วย เพื่อให้ tsx ทำการ reload เมื่อมีอะไรใน packages เปลี่ยนแปลง
ในที่นี้ผมใส่แบบเหมารวม ข้อเสียคือถ้า packages ไหนไม่เกี่ยวกับ api app ของเรา เมื่อ packages นั้นมีการแก้ไข code ด้านใน จะทำให้ apps ของเรา reload ไปด้วย
ถ้าจะให้มีประสิทธิภาพ ควรจะใส่ --include (มันใส่ได้หลายอัน) เฉพาะ packages ที่เกี่ยวข้อง แต่ script ก็จะยาวหน่อยนะ
เช่น ตัวอย่างนี้
pnpm pkg set 'scripts.dev=tsx watch --include \'../../packages/prisma/dist/**/*.ts\' --include \'../../packages/kafka/dist/**/*.ts\' src/index.ts'เราจะได้ package.json มาแบบนี้
api/package.json
{ "name": "api", "type": "module", "main": "./dist/esm/index.js", "scripts": { "dev": "tsx watch --include '../../packages/*/dist/**/*.js' src/index.ts", "build": "rslib build", "start": "node ./dist/esm/index.js" }, "dependencies": { "@hono/node-server": "^1.13.8", "@repo/prisma": "workspace:*", "hono": "^4.7.4" }, "devDependencies": { "@repo/eslint-config": "workspace:*", "@repo/rslib-config": "workspace:*", "@rslib/core": "^0.5.3", "@total-typescript/tsconfig": "^1.0.4", "@types/node": "^20.11.17", "tsx": "^4.7.1" }}จะเห็นว่า name มี value เป็น api นั่นหมายความว่า Hono backend ของเราอันนี้มีชื่อว่า api นะครับ
เพิ่ม packages แล้วก็ต้องสั่ง
pnpm icreate build config
เราจะต้องสร้าง rslib.config.ts เพื่อเอาไว้ build api ของเราด้วย
echo 'import config from "@repo/rslib-config/app"
export default config' > rslib.config.ts
จะได้ไฟล์ rslib.config.ts แบบนี้
rslib.config.ts
import config from "@repo/rslib-config/app"
export default configuse our prisma package
src/index.ts
import { serve } from "@hono/node-server"import { prismaClient } from "@repo/prisma"import { Hono } from "hono"
const app = new Hono()
app.get("/", (c) => { return c.text("Hello Hono!")})
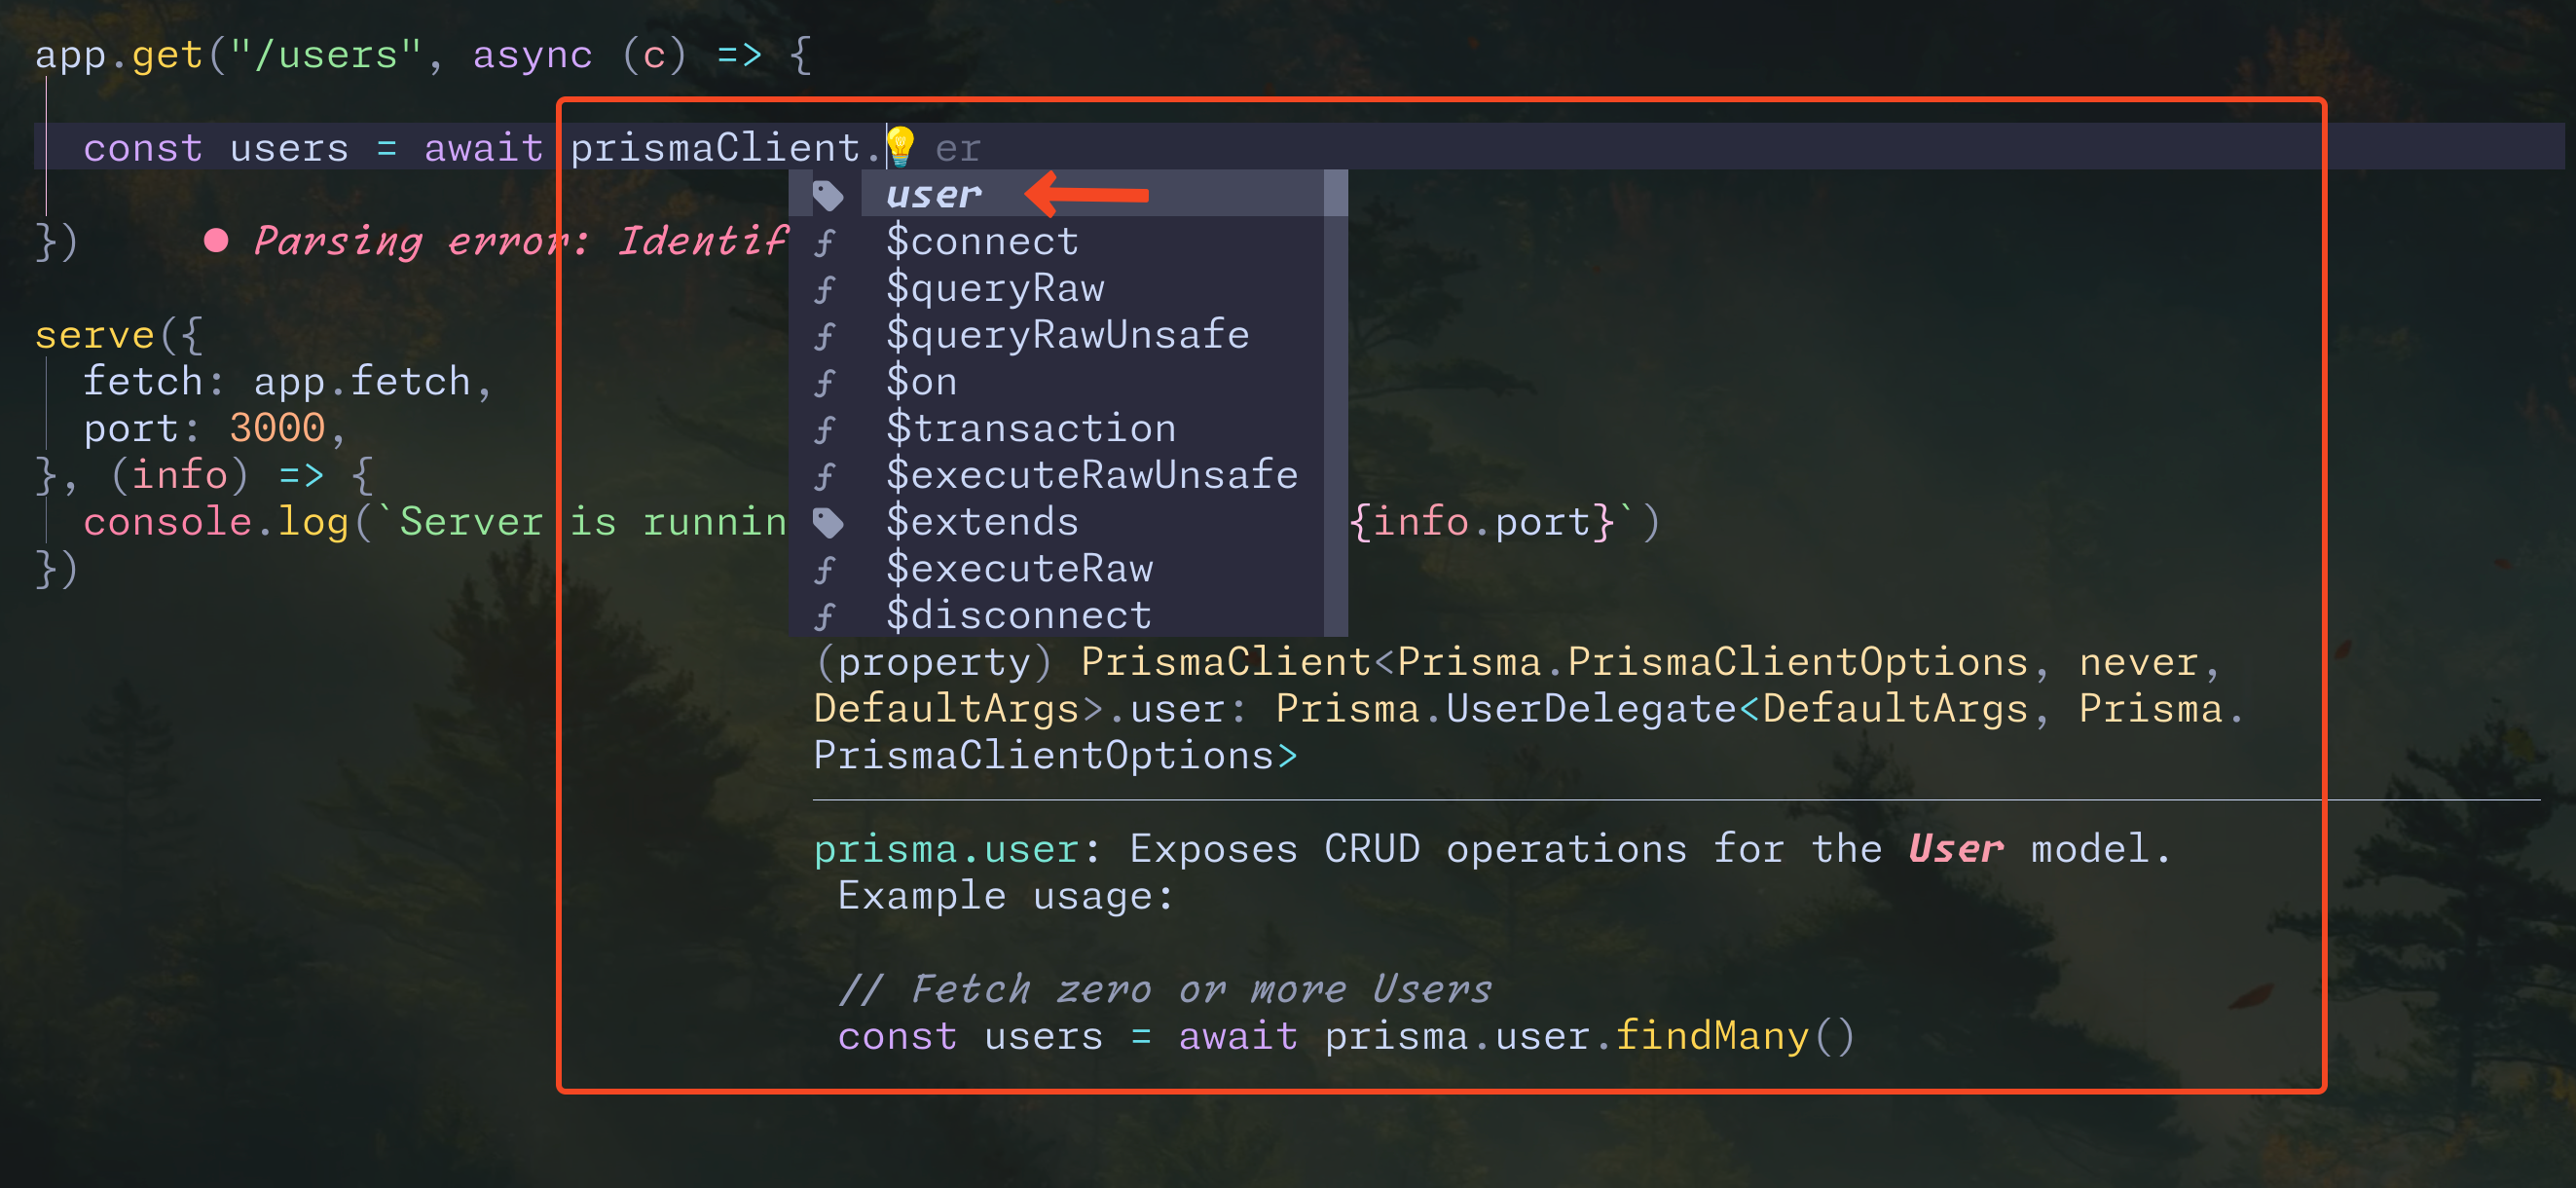
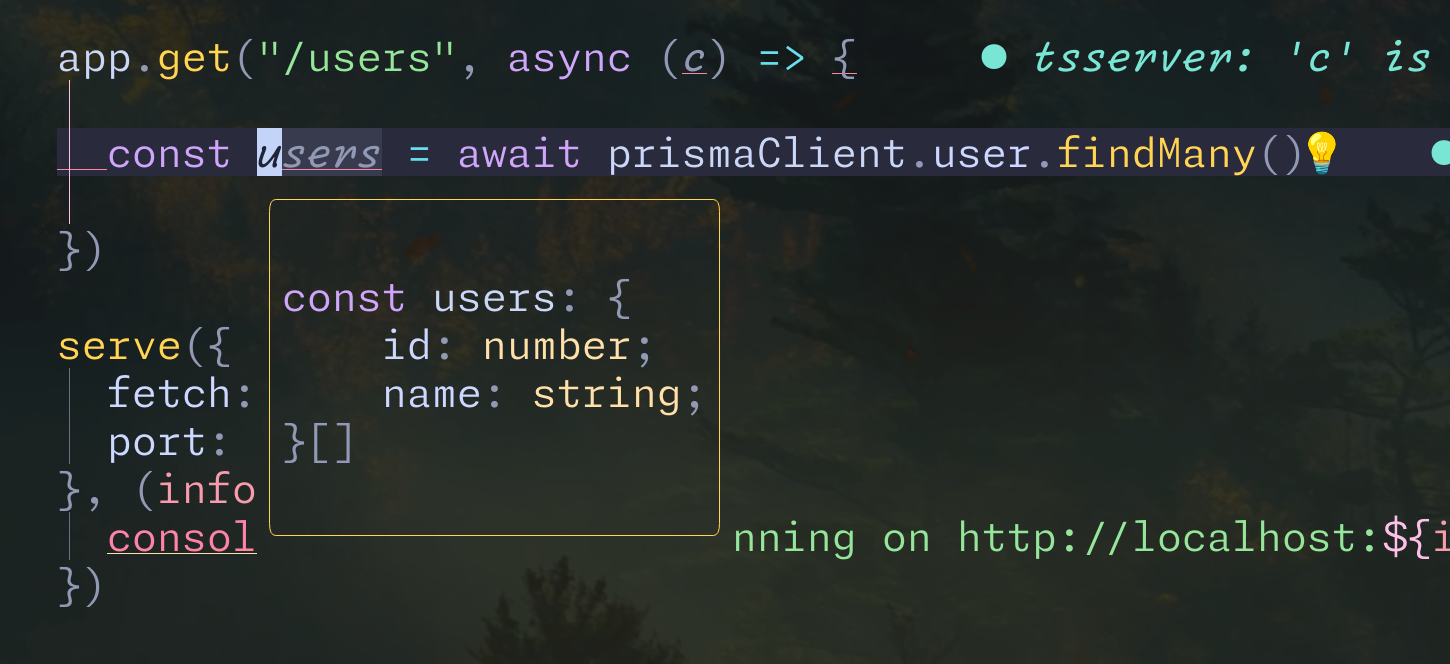
app.get("/users", async (c) => { const users = await prismaClient.user.findMany()
return c.json(users)})
serve({ fetch: app.fetch, port: 3000,}, (info) => { console.log(`Server is running on http://localhost:${info.port}`)})เราจะเห็นว่ามี autocomplete กับ type บอกให้เราครบถ้วน
มาทดสอบกันหน่อย
pnpm devลองยิง requst
curl http://localhost:3000/usersจะได้ Error ว่าหา Database ไม่เจอ แบบนี้หมายความว่า Prisma ทำงานแล้ว เพราะมันถามหา database แล้ว
Can't reach database server at `localhost:5432`
Please make sure your database server is running at `localhost:5432`.
ใน blog นี้ผมจะไม่ได้ setup data นะครับ เพราะมันจะนอกเรื่อง Turborepo ไปละ
Move Hono app to package
อย่างที่บอกไปว่าผมจะไม่ใช้ Hono เป็น app แต่จะทำเป็น pacakge แทน
วิธีการก็ไม่ยากเลย ย้าย code ทั้งหมดมา แค่ไม่ต้องสั่ง serve()
มาค่อยๆทำไปพร้อมๆกัน
ใน Terminal อยู่ที่ workspace root นะครับ ผม copy folder apps/api มาไว้ที่ pacakges/api ด้วยคำสั่ง
cp -R apps/api packages/apiจะได้
packages/api├── dist│ └── esm├── package.json├── README.md├── rslib.config.ts├── src│ └── index.ts└── tsconfig.jsonเราจะมาแก้ไข package.json กันก่อน
pnpm pkg set name=@repo/apipnpm pkg delete 'devDependencies.tsx'pnpm pkg delete 'main'pnpm pkg delete 'dependencies.@hono/node-server'
pnpm pkg set 'scripts.dev=rslib build --watch'pnpm pkg set 'exports[.].import.types=./dist/esm/src/index.d.ts'pnpm pkg set 'exports[.].import.default=./dist/esm/index.js'pnpm pkg set 'exports[.].require.types=./dist/cjs/src/index.d.ts'pnpm pkg set 'exports[.].require.default=./dist/cjs/index.cjs'
ทำอะไรไปบ้าง
- ผมแก้
nameให้เป็น@repo/api - ลบ
tsxออกจากdevDependencies - ลบ
main - ลบ
@hono/node-serverออกจากdependencies - เพิ่ม
exportsเหมือนกับที่ทำที่@repo/prismaเลย
จะได้แบบนี้
{ "name": "@repo/api", "type": "module", "scripts": { "dev": "rslib build --watch", "build": "rslib build", "start": "node ./dist/esm/index.js" }, "dependencies": { "@repo/prisma": "workspace:*", "hono": "^4.7.4" }, "devDependencies": { "@repo/eslint-config": "workspace:*", "@repo/rslib-config": "workspace:*", "@rslib/core": "^0.5.3", "@total-typescript/tsconfig": "^1.0.4", "@types/node": "^20.11.17" }, "exports": { ".": { "import": { "types": "./dist/esm/src/index.d.ts", "default": "./dist/esm/index.js" }, "require": { "types": "./dist/cjs/src/index.d.ts", "default": "./dist/cjs/index.cjs" } } }}update rslib.config.ts
เราจะต้องแก้ build config ด้วย เพราะเราเปลี่ยนเป็น package แล้ว
rslib.config.ts
import config from "@repo/rslib-config/lib"
export default configupdate index.ts
เราจะ export const routes ออกไป ไม่ใช่ app นะ
แล้วใช้ method chaining (คือใช้ .get().get().post() ต่อกันไปเรื่อยๆ ไม่ได้ใช้ app.get(), app.get() แล้ว) เพื่อให้ Hono Client มองเห็น type ทั้งหมดได้
ผมเพิ่ม route อีกเส้นนึงด้วย ส่ง json ตรงๆไม่ได้เรียกใช้ prisma เพราะไม่ได้มี database จริงๆ
สร้าง type App แล้ว export ออกไปเช่นกัน
ส่วน serve เราจะไม่ใช้แล้ว เดี๋ยวให้ api ใน apps เป็นคนเรียกใช้
src/index.ts
import { serve } from '@hono/node-server'import { Hono } from 'hono'import { prismaClient } from "@repo/prisma"
const app = new Hono()
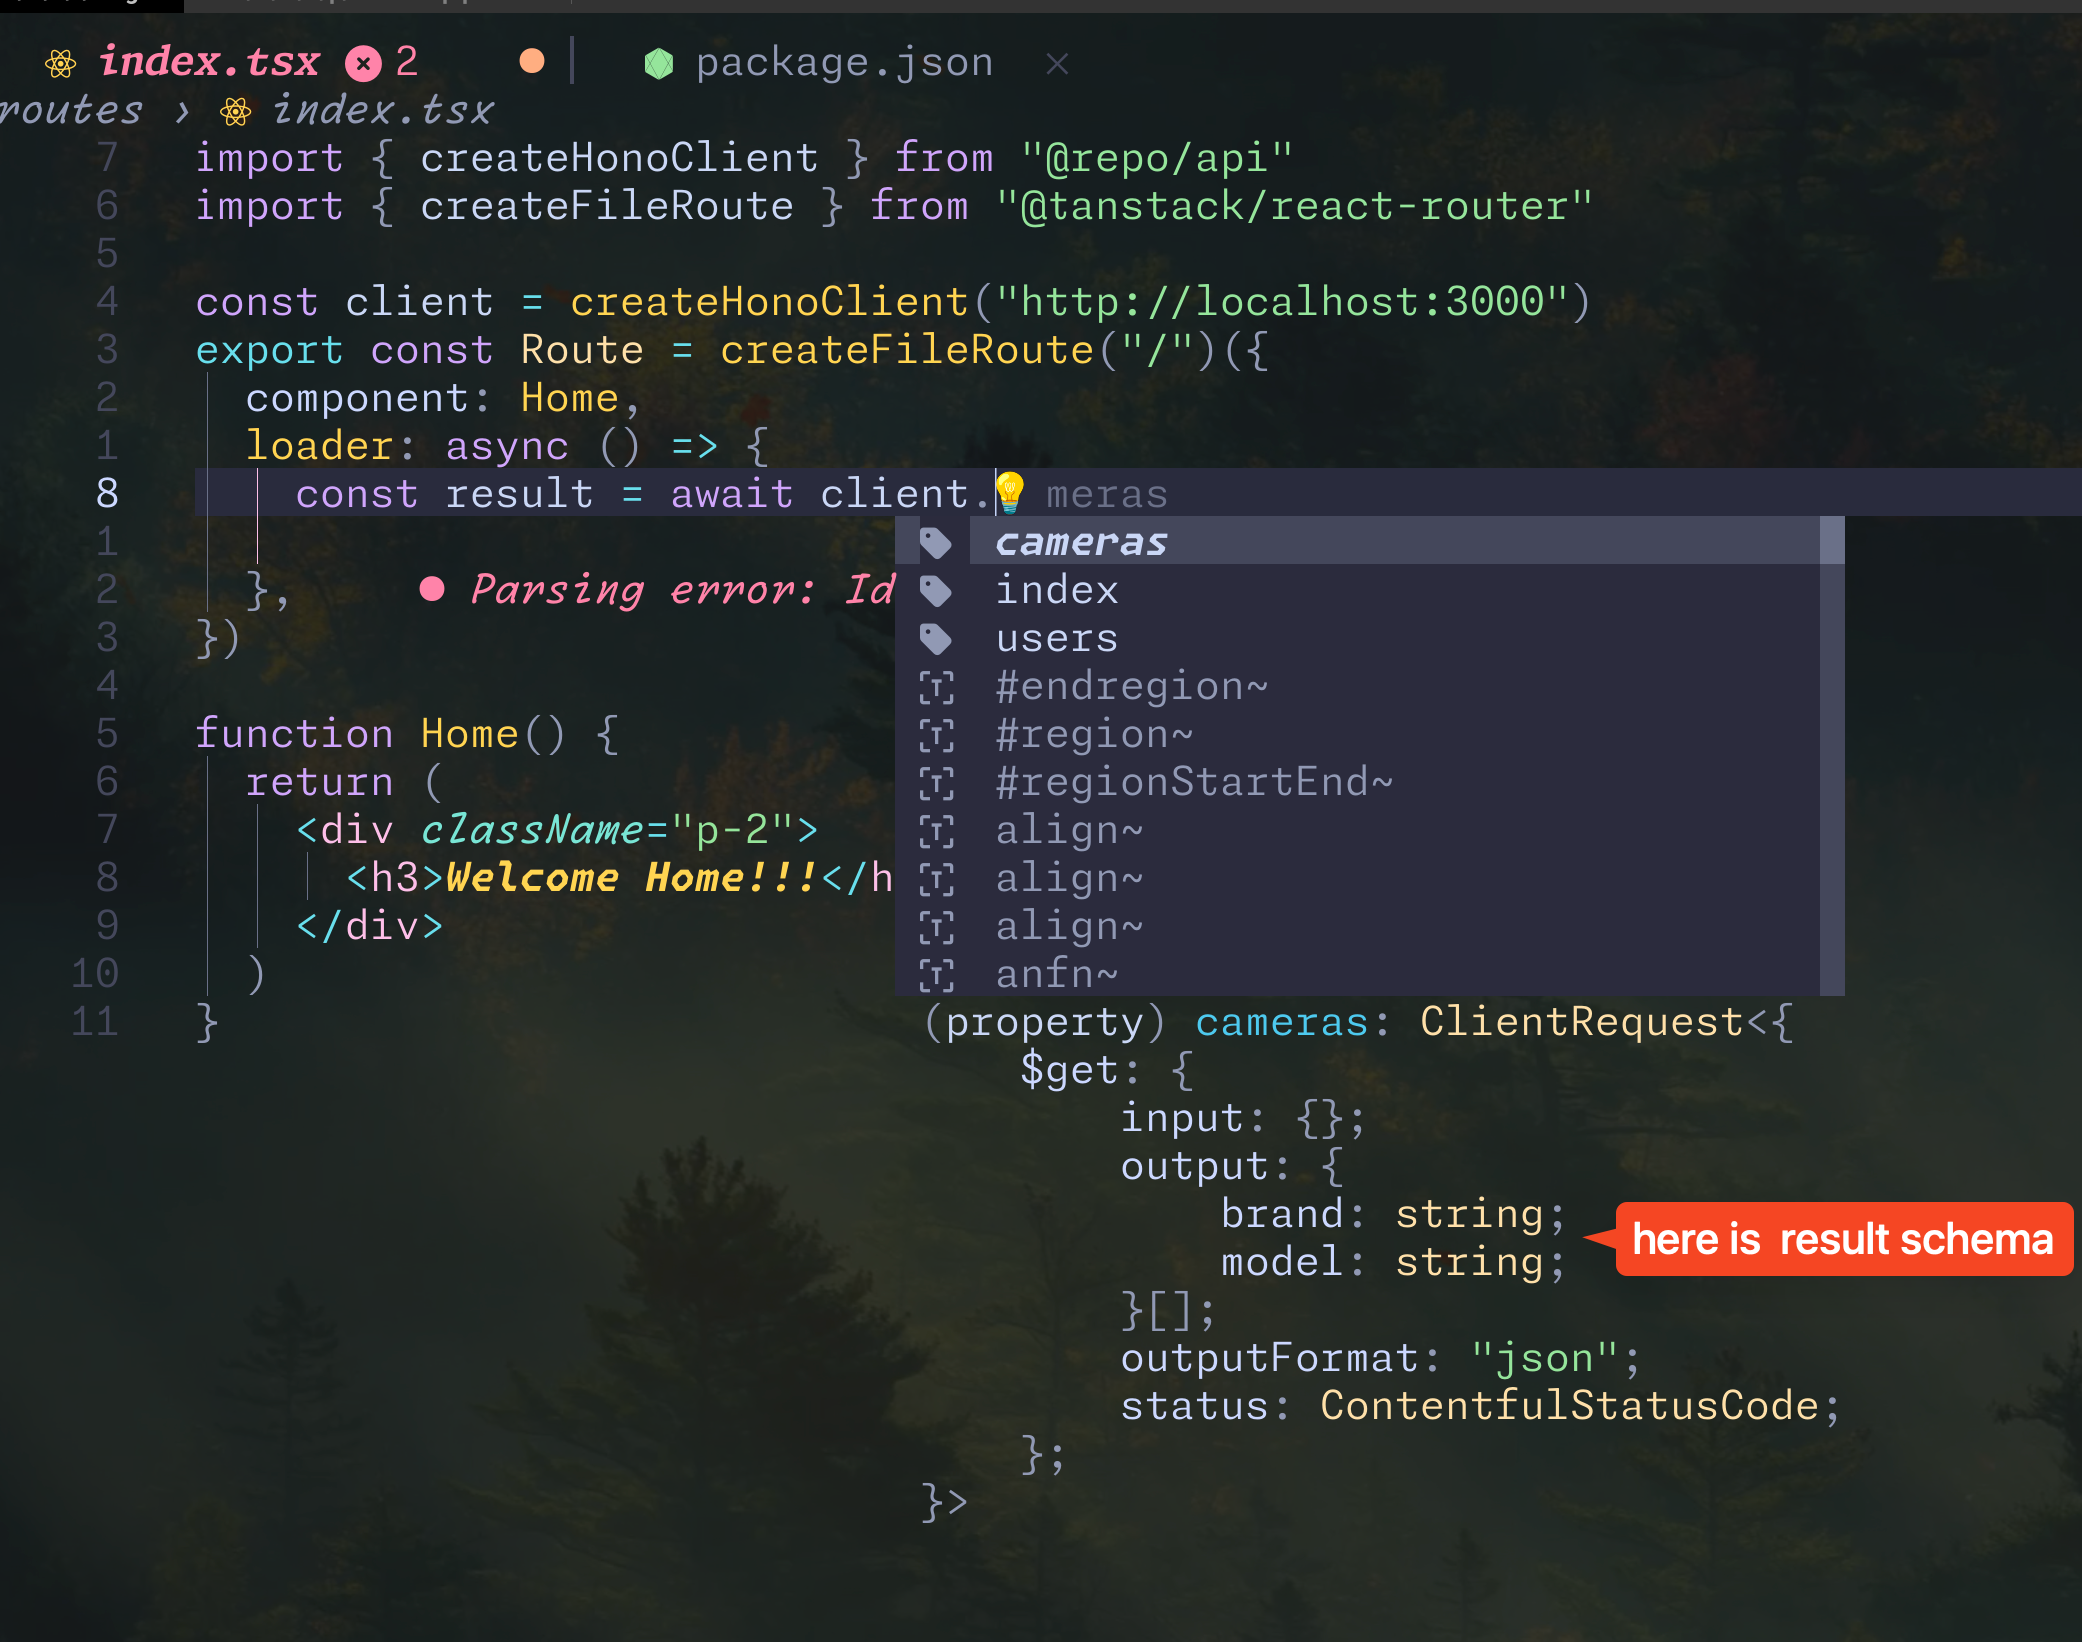
export const routes = app .get('/', (c) => { return c.text('Hello Hono!') }) .get("/users", async (c) => { const users = await prismaClient.user.findMany() console.log({ users }) return c.json(users) }) .get("/cameras", (c) => { return c.json([ { brand: "Canon", model: "R1", }, { brand: "Sony", model: "A9", }, { brand: "Nikon", model: "Z9", }, ]) })
export type App = typeof routes
serve({ fetch: app.fetch, port: 3000}, (info) => { console.log(`Server is running on http://localhost:${info.port}`)})ลอง build ดูซะหน่อย
❯ pnpm build
> @repo/api@ build /Users/atiwatseenark/Documents/learn/turborepo/blog/packages/api> rslib build
  Rslib v0.5.3
ready   built in 0.10 s (esm)ready   built in 0.10 s (cjs)start   Generating DTS... (esm)start   Generating DTS... (cjs)ready   DTS generated in 0.93 s (esm)ready   DTS generated in 0.92 s (cjs)
  File (cjs)            Size      Gzip  dist/cjs/index.cjs    1.5 kB
  -----
  File (esm)           Size       Gzip  dist/esm/index.js    0.38 kB    0.27 kB
ก็ผ่านนะ
ต่อไป เราจะกลับมาที่ apps/api กัน
use Hono package in Api App
delete existing api app
ผมจะลบ folder api ออกจาก apps เลย แล้วจะเริ่มสร้างขึ้นมาใหม่เลย
ที่ workspace root ให้สั่ง
rm -rf apps/apifolder apps ก็จะว่างเปล่าละ
ให้สั่ง
create new api app
mkdir apps/apicd apps/apiสร้าง api app ของเราด้วย scripts แบบนี้
หรือถ้าใครอยาก copy เองก็ด้านล่างเลย
pnpm init
pnpm pkg set name=apipnpm pkg set type=modulepnpm pkg set 'main=dist/esm/index.js'
pnpm pkg set 'dependencies.@repo/api=workspace:*'pnpm pkg set 'devDependencies.@repo/eslint-config=workspace:*'pnpm pkg set 'devDependencies.@repo/prisma=workspace:*'pnpm pkg set 'devDependencies.@repo/rslib-config=workspace:*'
pnpm pkg set 'scripts.dev=tsx watch --include \'../../packages/*/dist/**/*.js\' src/index.ts'pnpm pkg set 'scripts.build=rslib build'pnpm pkg set 'scripts.start=node ./dist/esm/index.js'pnpm pkg set 'scripts.check=tsc --noEmit'
pnpm pkg delete 'scripts.test'
pnpm add @hono/node-serverpnpm add -D typescript tsx @types/node @rslib/core @total-typescript/tsconfig
package.json
{ "name": "api", "version": "1.0.0", "description": "", "main": "index.js", "scripts": { "dev": "tsx watch --include '../../packages/*/dist/**/*.js' src/index.ts", "build": "rslib build", "start": "node ./dist/esm/index.js" }, "keywords": [], "author": "", "license": "ISC", "dependencies": { "@hono/node-server": "^1.13.8", "@repo/api": "workspace:*" }, "devDependencies": { "@repo/eslint-config": "workspace:*", "@repo/prisma": "workspace:*", "@repo/rslib-config": "workspace:*", "@rslib/core": "^0.5.3", "@types/node": "^22.13.9", "tsx": "^4.19.3" }}add tsconfig file
เพิ่ม tsconfig.json แบบนี้
echo '{ "extends": "@total-typescript/tsconfig/bundler/dom/app" } ' > tsconfig.jsonจะได้แบบนี้
tsconfig.json
{ "extends": "@total-typescript/tsconfig/bundler/dom/app"}add eslint config file
สร้าง eslint config file
echo 'import config from "@repo/eslint-config/antfu"export default config' > eslint.config.tsจะได้แบบนี้
eslint.config.ts
import config from "@repo/eslint-config/antfu"
export default configadd rslib config file
สร้าง rslib.config.ts
rslib.config.ts
import config from "@repo/rslib-config/app"
export default configสร้าง folder src กับไฟล์ index.ts
mkdir srctouch src/index.tsจากนั้นก็มาแก้ไฟล์ src/index.ts
เราจะใช้ app ที่ได้จาก packages/api แทนทั้งหมดเลย
ที่ไฟล์นี้จะเหลือแค่เรียกใช้ serve จาก @hono/node-server เท่านั้น
import { serve } from "@hono/node-server"import { routes } from "@repo/api"
serve({ fetch: routes.fetch, port: 3000,})
console.log("server started", 3000)จะเห็นว่าที่ apps/api ตรงนี้ เราเรียกใช้ serve จาก node-server ฉนั้นถ้าเราอยากเปลี่ยน serve adapter เป็น Deno หรือ Bun ก็ทำได้เลย
โดยที่เราก็ไม่ต้องไปแก้อะไรที่ packages/api เพราะไม่ว่าจะ adapter อะไร Hono ก็ยังเป็น Hono เหมือนเดิม
ลองยิง curl ดู ได้แบบนี้
❯ curl http://localhost:3000/Hello Hono!⏎ถือว่าทำงานได้ปกติ
ต่อไป เราจะไปสร้าง Frontend กันก่อน แล้วค่อยให้ Frontend ใช้ Hono client เพื่อทำ E2E Type-safe ภายหลัง
Frontend Tanstack start
จาก workspace root ให้ cd ไปที่ folder app
cd appscreate Tanstack start
npx degit https://github.com/tanstack/router/examples/react/start-basic webเราจะได้ folder web เพิ่มมา
apps├── api└── web ├── app ├── app.config.ts ├── package.json ├── postcss.config.mjs ├── public ├── README.md ├── tailwind.config.mjs └── tsconfig.jsoncd เข้ามาที่ web
cd webแก้ name ใน package.json
pnpm pkg set name=webแบบนี้
{ "name": "web", "private": true, "sideEffects": false, "type": "module", "scripts": { "dev": "vinxi dev", "build": "vinxi build", "start": "vinxi start" }, "dependencies": { "@tanstack/react-router": "^1.112.0", "@tanstack/react-start": "^1.112.3", "@tanstack/router-devtools": "^1.112.6", "react": "^19.0.0", "react-dom": "^19.0.0", "redaxios": "^0.5.1", "tailwind-merge": "^2.6.0", "vinxi": "0.5.3" }, "devDependencies": { "@types/node": "^22.5.4", "@types/react": "^19.0.8", "@types/react-dom": "^19.0.3", "autoprefixer": "^10.4.20", "postcss": "^8.5.1", "tailwindcss": "^3.4.17", "typescript": "^5.7.2", "vite-tsconfig-paths": "^5.1.4" }}แล้วก็ install package ได้เลย
pnpm iเสร็จแล้วลองสั่ง
pnpm run devจะมีหน้าเวปง่ายๆแบบนี้
use Hono client to fetch data
เราจะดึง data จาก Hono กันหน่อย
ผมจะย้อนกลับไปที่ api package ก่อน
ผมจะไปเพิ่ม Hono client ตรงนั้น แล้ว export มาให้ frontend เรียกใช้
packages/api/src/index.ts
import { Hono } from 'hono'import { prismaClient } from "@repo/prisma"import { hc } from "hono/client"29 collapsed lines
const app = new Hono()
export const routes = app .get('/', (c) => { return c.text('Hello Hono!') }) .get("/users", async (c) => { const users = await prismaClient.user.findMany() console.log({ users }) return c.json(users) }) .get("/cameras", (c) => { return c.json([ { brand: "Canon", model: "R1", }, { brand: "Sony", model: "A9", }, { brand: "Nikon", model: "Z9", }, ]) })
export type App = typeof routes
export const honoClient = (apiUrl: string) => hc<App>(apiUrl)แล้วก็สร้าง function ที่เอาไว้สร้าง Hono client อีกที เพื่อให้ Frontend แก้ได้ในภายหลังว่า url ของ api จะเป็นอะไร
ทีนี้ก็กลับมาที่ Frontend ของเรา
เราจะติดตั้ง @repo/api package นะครับ
pnpm pkg set 'dependencies.@repo/api=workspace:*'pnpm pkg set 'dependencies.@repo/eslint-config=workspace:*'pnpm pkg set 'scripts.dev=vinxi dev --port 3001'pnpm pkg set 'scripts.lint=eslint --fix .'โดย default Tanstack start จะใช้ port 3000 ผมเปลี่ยน port ด้วยเนื่องจากว่า hono api ใช้ port 3000 ไปแล้ว
cross check อีกที ใน package.json
{ "name": "web",3 collapsed lines
"private": true, "sideEffects": false, "type": "module", "scripts": { "dev": "vinxi dev --port 3001", "build": "vinxi build", "start": "vinxi start", "lint": "eslint --fix ." }, "dependencies": { "@repo/api": "workspace:*", "@repo/eslint-config": "workspace:*", "@tanstack/react-router": "^1.112.18", "@tanstack/react-start": "^1.112.19", "@tanstack/router-devtools": "^1.112.18", "react": "^19.0.0", "react-dom": "^19.0.0", "redaxios": "^0.5.1", "tailwind-merge": "^2.6.0", "vinxi": "0.5.3" }, "devDependencies": { "@types/node": "^22.5.4", "@types/react": "^19.0.8", "@types/react-dom": "^19.0.3", "autoprefixer": "^10.4.20", "postcss": "^8.5.1", "tailwindcss": "^3.4.17", "typescript": "^5.7.2", "vite-tsconfig-paths": "^5.1.4" }}เพิ่ม package แล้วก็อย่าลืมสั่ง
pnpm ifetch data from Hono app
ถัดมาเราจะมาใช้ hono client ในการดึง data นะครับ
ผมจะเรียกที่ Home page เลย
ไฟล์นี้
app9 collapsed lines
├── api.ts├── client.tsx├── components│ ├── DefaultCatchBoundary.tsx│ ├── NotFound.tsx│ ├── PostError.tsx│ └── UserError.tsx├── global-middleware.ts├── router.tsx├── routes5 collapsed lines
│ ├── __root.tsx│ ├── _pathlessLayout│ ├── _pathlessLayout.tsx│ ├── api│ ├── deferred.tsx│ ├── index.tsx17 collapsed lines
│ ├── posts.$postId.tsx│ ├── posts.index.tsx│ ├── posts.route.tsx│ ├── posts_.$postId.deep.tsx│ ├── redirect.tsx│ ├── users.$userId.tsx│ ├── users.index.tsx│ └── users.route.tsx├── routeTree.gen.ts├── ssr.tsx├── styles│ └── app.css└── utils ├── loggingMiddleware.tsx ├── posts.tsx ├── seo.ts └── users.tsxใน Tanstack start จะใช้ loader ในการดึง data และใช้ useLoaderData() เพื่อเอา data มาใช้งานใน page
สุดท้ายผมก็แปลงเป็น string แล้ว render มันทั้งอย่างนั้นเลย
index.tsx
import { createFileRoute } from '@tanstack/react-router'import { honoClient } from "@repo/api"
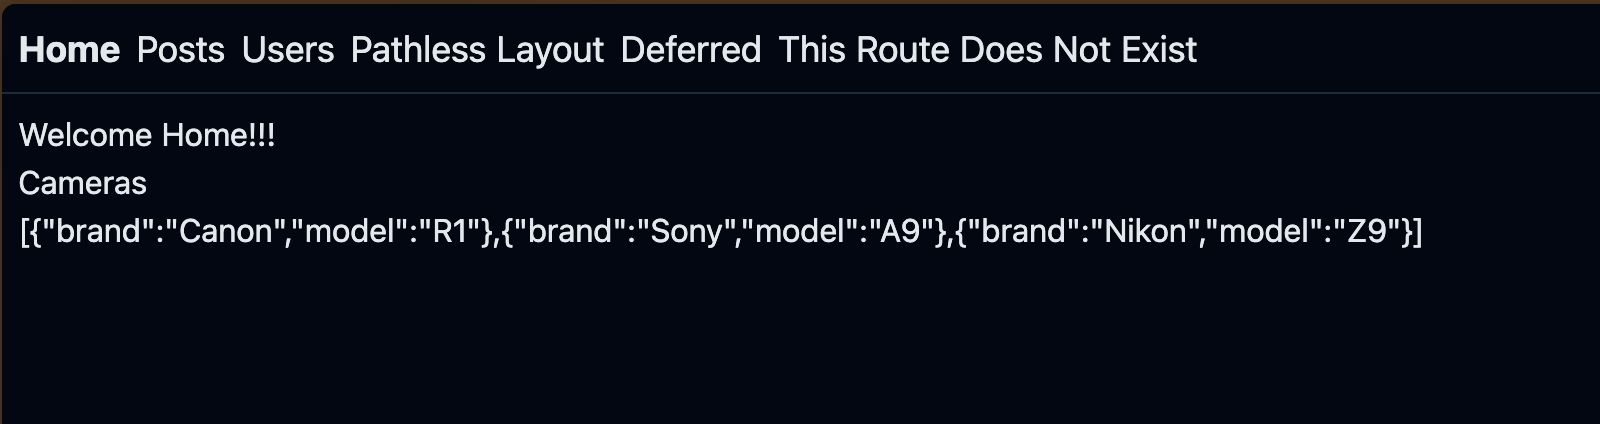
export const Route = createFileRoute('/')({ component: Home, loader: async () => { const hc = honoClient("http://localhost:3000") const cameras = await hc.cameras.$get() return cameras.json() }})
function Home() { const state = Route.useLoaderData() return ( <div className="p-2"> <h3>Welcome Home!!!</h3> <h3>Cameras</h3> <div> {JSON.stringify(state)} </div> </div> )}จะเห็นว่ามี type บอกครบเลย
เราใช้ Tanstack start ซึ่งทำ SSR ได้
ตัว loader ก็จะทำงานที่ฝั่ง server นะครับ
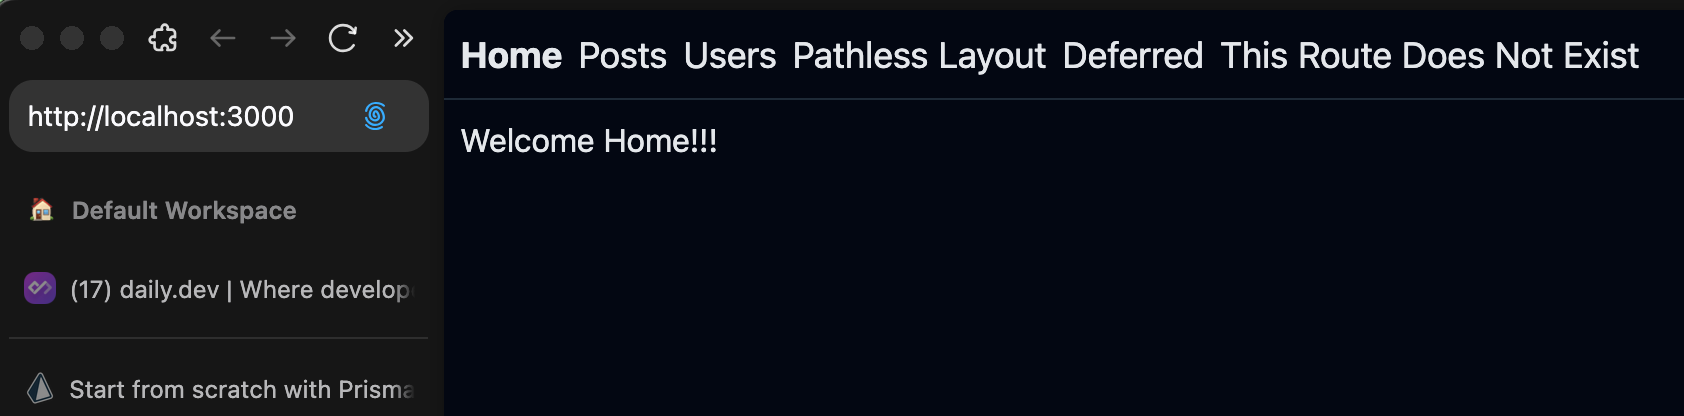
พอดูหน้าเวปที่ homepage ก็จะได้
Shadcn package
เราจะมาทำ package สำหรับ Shadcn ui components กัน
อันนี้จะยากที่สุดละ ใน Tutorial นี้
มันจะมี setup เยอะมากๆ บวกกับ Tanstack start ที่ยังเป็น Beta ด้วย
บางอย่างก็ต้อง install ทั้งใน package และ ใน web framework สองที่เลย
ค่อยๆทำตามนะครับ
folders and files
ให้ดูภาพรวมก่อน เดี๋ยวเราจะมี folders กับ files แบบนี้
packages/shadcn├── src/│ ├── index.css│ ├── components/│ ├── hooks/│ └── lib/│ └── utils.ts├── components.json├── eslint.config.ts├── package.json├── postcss.config.mjs└── tsconfig.jsonremove tailwindcss version3
ผมอยากให้เข้าใจก่อนว่า ตอนนี้ Tanstack start มันยังเป็น Beta อยู่
เราแค่จะลองใช้งาน ตอนที่เราสร้าง project Tanstack start แบบที่เราทำไปนั้นมันแค่การ clone template เค้ามาเท่านั้น
และมันมี tailwindcss ติดมาด้วยอยู่แล้ว แต่มันเป็น version 3
ตอนนี้ tailwindcss มี version 4 ออกมาแล้ว ผมก็เลยจะลบ tailwindcss v3 ที่อยู่ใน Tanstack start ทิ้งไปก่อน แล้วค่อยกลับมาติดตั้งอีกครั้งภายหลัง
cd apps/webpnpm rm tailwindcssที่ workspace root
mkdir packages/shadcncd packages/shadcncreate package.json
pnpm initpnpm pkg set name=@repo/shadcnpnpm pkg set type=modulepnpm pkg set 'version=0.0.0'pnpm pkg delete mainpnpm pkg delete scripts.testpnpm pkg set 'devDependencies.@repo/eslint-config=workspace:*'pnpm add react react-dompnpm add -D typescript @total-typescript/tsconfig @types/node @types/react @types/react-domcreate tsconfig file
สร้างไฟล์ tsconfig.json แล้วใส่ config แบบนี้
tsconfig.json
{ "extends": "@total-typescript/tsconfig/bundler/dom/app", "compilerOptions": { "jsx": "react-jsx", "module": "ESNext", "moduleResolution": "Bundler", "lib": [ "DOM", "DOM.Iterable", "ES2022" ], "forceConsistentCasingInFileNames": true, "baseUrl": ".", "paths": { "@repo/shadcn/*": [ "./src/*" ] } }, "include": [ "**/*.ts", "**/*.tsx" ], "exclude": [ "node_modules", "dist" ]}จาก code ด้านบน ในส่วนของ paths ผมใส่ @repo/shadcn/* ซึ่งก็ต้องให้ตรงกับ name ใน package.json นี้นี่แหละ
จะต่างกับใน docs ของ shadcn ที่แนะนำให้ใส่ @/* เพราะว่าแบบ @/* ใช้กับ frontend ที่ไม่ใช่ Monorepo
create eslint config file
สร้างไฟล์ eslint.config.ts
จะใช้คำสั่งหรือ copy code ก็ได้นะ
echo 'import config from "@repo/eslint-config/antfu"
export default config' > eslint.config.ts
จะได้แบบนี้
eslint.config.ts
import config from "@repo/eslint-config/antfu"
export default configinstall tailwindcss v4
ขั้นตอนที่ผมพาทำผมก็ทำตาม docs นี้ครับ
โดยเราจะใช้ postcss นะครับ
install packages
pnpm add tailwindcss @tailwindcss/postcss postcsscreate postcss config file
สร้างไฟล์ postcss.config.mjs
สั่ง command หรือ copy code ด้านล่างก็ได้
echo 'export default { plugins: { "@tailwindcss/postcss": {}, }}' > postcss.config.mjspostcss.config.mjs
export default { plugins: { "@tailwindcss/postcss": {}, }}create css file
สร้างไฟล์ src/index.css
ด้วยคำสั่ง
mkdir srcecho '@import "tailwindcss";' > src/index.cssจะได้ไฟล์ scr/index.css แบบนี้
@import "tailwindcss";install Shadcn
ก็จะทำตาม shadcn manual installation docs
install packages
pnpm add tailwindcss-animate class-variance-authority clsx tailwind-merge lucide-reactadd paths to tsconfig.json
อันนี้เราได้ทำกันไปแล้ว
add shadcn css to index.css
ไปที่ไฟล์ src/index.css ที่เราได้สร้างไว้ ใส่ css ของ Shadcn เข้าไปแบบนี้
css ของ Shadcn เราสามารถแก้ได้นะ เอาให้เป็นแบบที่เราชอบได้เลย แก้ได้ทุกจุด
แต่ว่าจะมีส่วนที่แตกต่างจาก docs ของ Shadcn อยู่นิดนึง คือตรงที่ไฮไลท์สีเขียว @source
คือเราต้องบอก Tailwind ด้วยว่า components ของเราที่จะใช้ Tailwindcss อยู่ที่ไหนบ้าง
@import "tailwindcss";
@source "../../../apps/**/*.{ts,tsx}";@source "../../../components/**/*.{ts,tsx}";@source "../**/*.{ts,tsx}";
@plugin 'tailwindcss-animate';
@custom-variant dark (&:is(.dark *));
:root {33 collapsed lines
--background: oklch(1 0 0); --foreground: oklch(0.145 0 0); --card: oklch(1 0 0); --card-foreground: oklch(0.145 0 0); --popover: oklch(1 0 0); --popover-foreground: oklch(0.145 0 0); --primary: oklch(0.205 0 0); --primary-foreground: oklch(0.985 0 0); --secondary: oklch(0.97 0 0); --secondary-foreground: oklch(0.205 0 0); --muted: oklch(0.97 0 0); --muted-foreground: oklch(0.556 0 0); --accent: oklch(0.97 0 0); --accent-foreground: oklch(0.205 0 0); --destructive: oklch(0.577 0.245 27.325); --destructive-foreground: oklch(0.577 0.245 27.325); --border: oklch(0.922 0 0); --input: oklch(0.922 0 0); --ring: oklch(0.708 0 0); --chart-1: oklch(0.646 0.222 41.116); --chart-2: oklch(0.6 0.118 184.704); --chart-3: oklch(0.398 0.07 227.392); --chart-4: oklch(0.828 0.189 84.429); --chart-5: oklch(0.769 0.188 70.08); --radius: 0.625rem; --sidebar: oklch(0.985 0 0); --sidebar-foreground: oklch(0.145 0 0); --sidebar-primary: oklch(0.205 0 0); --sidebar-primary-foreground: oklch(0.985 0 0); --sidebar-accent: oklch(0.97 0 0); --sidebar-accent-foreground: oklch(0.205 0 0); --sidebar-border: oklch(0.922 0 0); --sidebar-ring: oklch(0.708 0 0);}
.dark {32 collapsed lines
--background: oklch(0.145 0 0); --foreground: oklch(0.985 0 0); --card: oklch(0.145 0 0); --card-foreground: oklch(0.985 0 0); --popover: oklch(0.145 0 0); --popover-foreground: oklch(0.985 0 0); --primary: oklch(0.985 0 0); --primary-foreground: oklch(0.205 0 0); --secondary: oklch(0.269 0 0); --secondary-foreground: oklch(0.985 0 0); --muted: oklch(0.269 0 0); --muted-foreground: oklch(0.708 0 0); --accent: oklch(0.269 0 0); --accent-foreground: oklch(0.985 0 0); --destructive: oklch(0.396 0.141 25.723); --destructive-foreground: oklch(0.637 0.237 25.331); --border: oklch(0.269 0 0); --input: oklch(0.269 0 0); --ring: oklch(0.439 0 0); --chart-1: oklch(0.488 0.243 264.376); --chart-2: oklch(0.696 0.17 162.48); --chart-3: oklch(0.769 0.188 70.08); --chart-4: oklch(0.627 0.265 303.9); --chart-5: oklch(0.645 0.246 16.439); --sidebar: oklch(0.205 0 0); --sidebar-foreground: oklch(0.985 0 0); --sidebar-primary: oklch(0.488 0.243 264.376); --sidebar-primary-foreground: oklch(0.985 0 0); --sidebar-accent: oklch(0.269 0 0); --sidebar-accent-foreground: oklch(0.985 0 0); --sidebar-border: oklch(0.269 0 0); --sidebar-ring: oklch(0.439 0 0);}
@theme inline {36 collapsed lines
--color-background: var(--background); --color-foreground: var(--foreground); --color-card: var(--card); --color-card-foreground: var(--card-foreground); --color-popover: var(--popover); --color-popover-foreground: var(--popover-foreground); --color-primary: var(--primary); --color-primary-foreground: var(--primary-foreground); --color-secondary: var(--secondary); --color-secondary-foreground: var(--secondary-foreground); --color-muted: var(--muted); --color-muted-foreground: var(--muted-foreground); --color-accent: var(--accent); --color-accent-foreground: var(--accent-foreground); --color-destructive: var(--destructive); --color-destructive-foreground: var(--destructive-foreground); --color-border: var(--border); --color-input: var(--input); --color-ring: var(--ring); --color-chart-1: var(--chart-1); --color-chart-2: var(--chart-2); --color-chart-3: var(--chart-3); --color-chart-4: var(--chart-4); --color-chart-5: var(--chart-5); --radius-sm: calc(var(--radius) - 4px); --radius-md: calc(var(--radius) - 2px); --radius-lg: var(--radius); --radius-xl: calc(var(--radius) + 4px); --color-sidebar: var(--sidebar); --color-sidebar-foreground: var(--sidebar-foreground); --color-sidebar-primary: var(--sidebar-primary); --color-sidebar-primary-foreground: var(--sidebar-primary-foreground); --color-sidebar-accent: var(--sidebar-accent); --color-sidebar-accent-foreground: var(--sidebar-accent-foreground); --color-sidebar-border: var(--sidebar-border); --color-sidebar-ring: var(--sidebar-ring);}
@layer base {6 collapsed lines
* { @apply border-border outline-ring/50; } body { @apply bg-background text-foreground; }}create helper functions
สร้างไฟล์ lib/utils.ts
import { clsx, type ClassValue } from "clsx"import { twMerge } from "tailwind-merge"
export function cn(...inputs: ClassValue[]) { return twMerge(clsx(inputs))}create shadcn config file (components.json)
เราจะสร้างไฟล์ components.json ไฟล์นี้เป็นเหมือน config ของ Shadcn น่ะแหละ
สิ่งที่เราต้องใส่ในไฟล์นี้จะมีบางส่วนที่ไม่เหมือนกับใน docs ของ Shadcn นะครับ
ผมจะไฮไลท์สีเขียวไว้
components.json
{ "$schema": "https://ui.shadcn.com/schema.json", "style": "new-york", "rsc": false, "tsx": true, "tailwind": { "config": "", "css": "./src/index.css", "baseColor": "neutral", "cssVariables": true, "prefix": "" }, "aliases": { "components": "@repo/shadcn/components", "ui": "@repo/shadcn/components", "utils": "@repo/shadcn/lib/utils", "lib": "@repo/shadcn/lib", "hooks": "@repo/shadcn/hooks" }, "iconLibrary": "lucide"}จาก code ด้านบน ผมจะอธิบายเพิ่มแบบนี้
tailwind.configเป็นค่าว่างๆนะ เพราะเราใช้ tailwind v4 ไม่จำเป็นต้องมี tailwind.config.js ก็ได้ แต่ถ้ามีก็เอามาใส่ตรงนี้แหละaliasesทุกๆ keys ด้านใน จะ ใส่ aliases ให้ตรงกับexportsในpackage.jsonนะ (เรายังไม่ได้ทำ เดี๋ยวจะใส่exportsด้านล่างนี่แหละ)
exports files in package.json
เราจะใส่ exports ใน package.json ด้วยคำสั่ง
pnpm pkg set 'exports[./css]=./src/index.css'pnpm pkg set 'exports[./postcss.config]=./postcss.config.mjs'pnpm pkg set 'exports[./lib/*]=./src/lib/*.ts'pnpm pkg set 'exports[./components/*]=./src/components/*.tsx'pnpm pkg set 'exports[./hooks/*]=./src/hooks/*.tsx'ในไฟล์ package.json เราจะมี dependencies กับ devDependencies ต่างๆ ตามนี้
package.json
{ "name": "@repo/shadcn", "version": "0.0.0", "description": "", "scripts": {}, "keywords": [], "author": "", "license": "ISC", "type": "module", "devDependencies": { "@repo/eslint-config": "workspace:*", "@total-typescript/tsconfig": "^1.0.4", "@types/node": "^22.13.9", "@types/react": "^19.0.10", "@types/react-dom": "^19.0.4", "typescript": "^5.8.2" }, "dependencies": { "@tailwindcss/postcss": "^4.0.12", "class-variance-authority": "^0.7.1", "clsx": "^2.1.1", "lucide-react": "^0.479.0", "postcss": "^8.5.1", "react": "^19.0.0", "react-day-picker": "8.10.1", "react-dom": "^19.0.0", "tailwind-merge": "^2.6.0", "tailwindcss": "^4.0.6", "tailwindcss-animate": "^1.0.7" }, "exports": { "./css": "./src/index.css", "./postcss.config": "./postcss.config.mjs", "./lib/*": "./src/lib/*.ts", "./components/*": "./src/components/*.tsx", "./hooks/*": "./src/hooks/*.ts" }}install Shadcn Button
เราจะมาลอง install Shadcn Button กัน
ยังอยู่ใน packages/shadcn นะครับ
ให้สั่ง
pnpm dlx shadcn@latest add buttonจะได้แบบนี้
❯ pnpm dlx shadcn@latest add button✔ Checking registry.✔ Installing dependencies.✔ Created 1 file: - src/components/button.tsxเราจะได้ไฟล์ button.tsx เพิ่มมาแบบนี้
src├── components│ ├── button.tsx├── hooks/├── index.css└── lib/component Button ที่ได้มาผมจะไม่แก้อะไร จะเอาไปใช้ที่ web เลย
use Shadcn package in Web
เราจะเอา package shadcn มาใช้งานละ
มาที่ apps/web ของเรา
cd apps/webinstall package @repo/shadcn
เพิ่ม @repo/shadcn ใน package.json
pnpm pkg set 'dependencies.@repo/shadcn=workspace:*'pnpm icreate postcss config file
สร้างไฟล์ postcss.config.mjs
เราจะเอา postcss config file ที่อยู่ใน @repo/shadcn มาใช้งาน
echo 'import postcssConfig from "@repo/shadcn/postcss.config"export default postcssConfig' > postcss.config.mjsจะได้ไฟล์ postcss.config.mjs แบบนี้
postcss.config.mjs
import postcssConfig from "@repo/shadcn/postcss.config"export default postcssConfigsetup tsconfig.json
เราจะต้องเพิ่ม paths ใน tsconfig.json อีก
เพิ่ม @repo/shadcn ตามที่ชื่อของ shadcn package นะ
แล้วให้ชี้ไปที่ src ที่ shadcn package จริงๆผ่าน relative paths เพื่อให้ auto-import ช่วย import components ได้ถูก
tsconfig.json
{23 collapsed lines
"extend": "", "include": [ "**/*.ts", "**/*.tsx" ], "compilerOptions": { "strict": true, "esModuleInterop": true, "jsx": "react-jsx", "module": "ESNext", "moduleResolution": "Bundler", "lib": [ "DOM", "DOM.Iterable", "ES2022" ], "isolatedModules": true, "resolveJsonModule": true, "skipLibCheck": true, "target": "ES2022", "allowJs": true, "forceConsistentCasingInFileNames": true, "baseUrl": ".", "paths": {3 collapsed lines
"~/*": [ "./app/*", ], "@repo/shadcn/*": [ "../../packages/shadcn/src/*" ] }, "noEmit": true }}ลองใช้ Button component ดูที่ home page
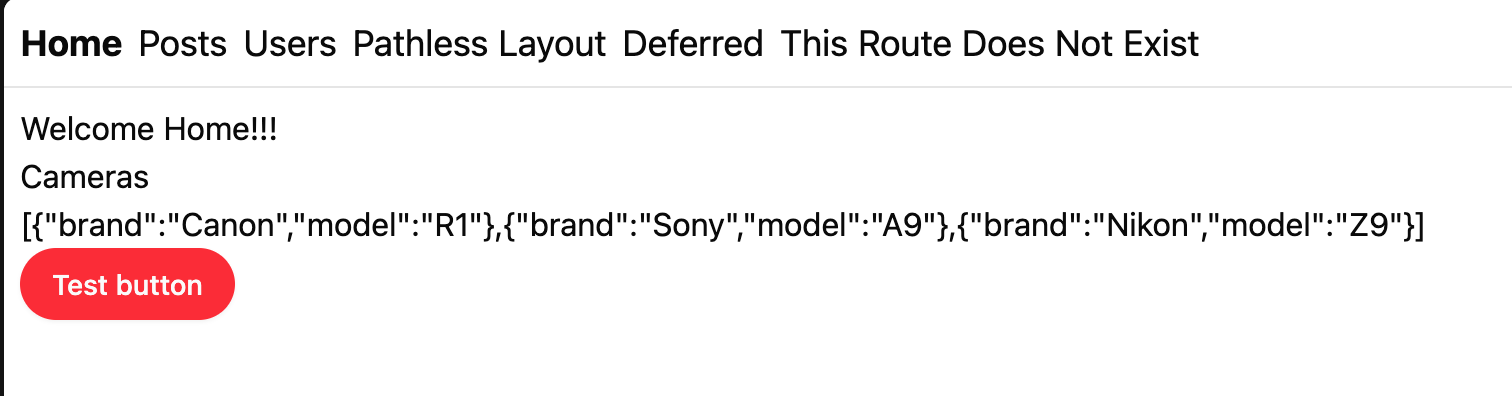
import { createFileRoute } from '@tanstack/react-router'import { honoClient } from "@repo/api"import { Button } from '@repo/shadcn/components/button'
export const Route = createFileRoute('/')({ component: Home, loader: async () => { const hc = honoClient("http://localhost:3000") const cameras = await hc.cameras.$get() return cameras.json() }})
function Home() { const state = Route.useLoaderData() return ( <div className="p-2"> <h3>Welcome Home!!!</h3> <h3>Cameras</h3> <div> {JSON.stringify(state)} </div>
<Button className="p-4 bg-red-500 rounded-full" >Test button</Button> </div> )}เปิดหน้าเวปจะได้แบบนี้
ลองอีก component นึง
รอบนี้ลองใช้ Calendar
มาที่ packages/shadcn
cd packages/shadcnpnpm dlx shadcn@latest add calendarจะได้แบบนี้
❯ cd packages/shadcn pnpm dlx shadcn@latest add calendar✔ Checking registry.✔ Installing dependencies.✔ Created 1 file: - src/components/calendar.tsxℹ Skipped 1 files: (files might be identical, use --overwrite to overwrite) - src/components/button.tsxเหมือนเดิม ผมจะไม่แก้อะไรใน Calendar component เลย
ไปลองใช้งานกันเลย
ลองใช้ Calendar component ดูที่ home page
import { createFileRoute } from '@tanstack/react-router'import { honoClient } from "@repo/api"import { Button } from '@repo/shadcn/components/button'import { Calendar } from '@repo/shadcn/components/calendar'import { useState } from 'react'
export const Route = createFileRoute('/')({ component: Home, loader: async () => { const hc = honoClient("http://localhost:3000") const cameras = await hc.cameras.$get() return cameras.json() }})
function Home() { const state = Route.useLoaderData() const [date, setDate] = useState<Date | undefined>(new Date()) return ( <div className="p-2"> <h3>Welcome Home!!!</h3> <h3>Cameras</h3> <div> {JSON.stringify(state)} </div>
<Button className="p-4 bg-red-500 rounded-full" >Test button</Button> <Calendar mode="single" selected={date} onSelect={setDate} className="w-full rounded-md border shadow" /> </div> )}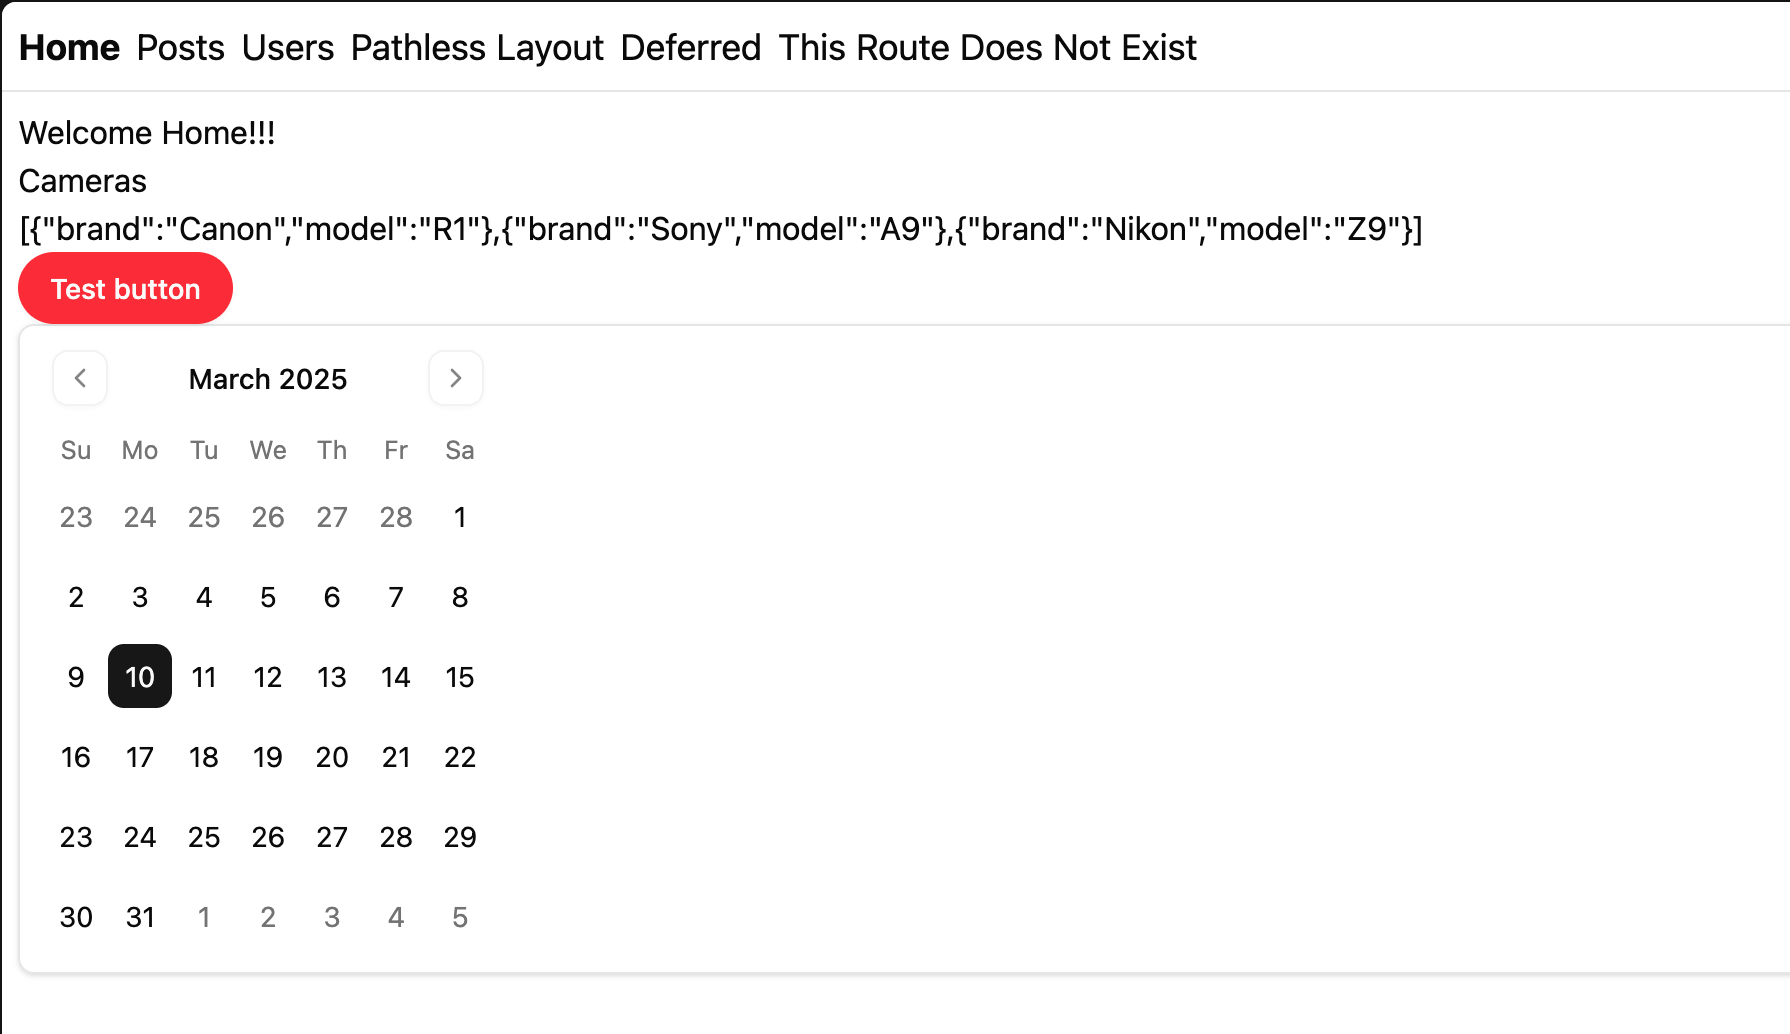
ถึงตรงนี้เพื่อนๆน่าจะใช้ Shadcn ใน Turborepo ได้แล้ว
Husky + Gitmoji
กลับมาที่ workspace ของเรา
install husky
ติดตั้ง husky ด้วยคำสั่ง
pnpm add --save-dev husky -w && pnpm exec husky initผมจะสร้างไฟล์ install สำหรับ husky ใหม่ เพราะผมชอบลืมใส่ env HUSKY=0 เพื่อ disable husky ที่ CI pipeline ก็เลยใช้วิธีนี้แทน
สร้างไฟล์ .husky/install.mjs
echo '// Skip Husky install in production and CIif (process.env.NODE_ENV === 'production' || process.env.CI === 'true') { process.exit(0)}const husky = (await import('husky')).defaultconsole.log(husky());' > .husky/install.mjsแก้ script prepare เพื่อให้เรียกใช้ script install ที่เราสร้าง
pnpm pkg set \ 'scripts.prepare=node .husky/install.mjs'ที่ package.json ของ workspace จะได้แบบนี้
package.json
{ "name": "blog", "private": true, "scripts": { "build": "turbo run build", "lint": "turbo run lint", "format": "prettier --write \"**/*.{ts,tsx,md}\"", "check-types": "turbo run check-types", "dev": "turbo run dev", "prepare": "node .husky/install.mjs" }, "devDependencies": { "eslint": "^9.21.0", "eslint-plugin-oxlint": "^0.15.13", "eslint-plugin-perfectionist": "^4.9.0", "husky": "^9.1.7", "jiti": "^2.4.2", "prettier": "^3.5.3", "turbo": "^2.4.4", "typescript": "5.8.2" }, "packageManager": "pnpm@9.0.0", "engines": { "node": ">=18" }}install commitlint and gitmoji
pnpm i -D commitlint-config-gitmoji commitlint -wสร้าง commitlint config file
echo 'module.exports = { extends: ["gitmoji"],};' > commitlint.config.cjsจะได้ commitlint.config.cjs แบบนี้
commitlint.config.cjs
module.exports = { extends: ["gitmoji"],};จากนั้นไป set ให้ husky เรียกใช้ commitlint แบบนี้
echo 'pnpm dlx commitlint --edit "$1"' > .husky/commit-msgจะได้ไฟล์ .husky/commit-msg แบบนี้
pnpm dlx commitlint --edit "$1"ติดตั้ง commitizen
pnpm add -D commitizen cz-customizable -wpnpm pkg set config.commitizen.path="node_modules/cz-customizable"pnpm pkg set config.cz-customizable.config="./cz.config.cjs"เพิ่ม script ที่เอาไว้เรียกใช้แทน git commit
pnpm pkg set \ 'scripts.commit=cz'จะได้ package.json ของ workspace แบบนี้
{ "name": "blog", "private": true, "scripts": {6 collapsed lines
"build": "turbo run build", "lint": "turbo run lint", "format": "prettier --write \"**/*.{ts,tsx,md}\"", "check-types": "turbo run check-types", "dev": "turbo run dev", "prepare": "node .husky/install.mjs", "commit": "cz" }, "devDependencies": { "commitizen": "^4.3.1", "commitlint": "^19.8.0", "commitlint-config-gitmoji": "^2.3.1", "cz-customizable": "^7.4.0",8 collapsed lines
"eslint": "^9.21.0", "eslint-plugin-oxlint": "^0.15.13", "eslint-plugin-perfectionist": "^4.9.0", "husky": "^9.1.7", "jiti": "^2.4.2", "prettier": "^3.5.3", "turbo": "^2.4.4", "typescript": "5.8.2" },4 collapsed lines
"packageManager": "pnpm@9.0.0", "engines": { "node": ">=18" }, "config": { "commitizen": { "path": "node_modules/cz-customizable" }, "cz-customizable": { "config": "./cz.config.cjs" } }}สร้าง cz config file
touch cz.config.cjsใส่ code template แบบนี้
ตรงนี้เพื่อนๆก็แก้เอาตามชอบนะครับ
cz.config.cjs
module.exports = { types: [ { value: ':sparkles: feat', name: '✨ feat:\tAdding a new feature' }, { value: ':bug: fix', name: '🐛 fix:\tFixing a bug' }, { value: ':memo: docs', name: '📝 docs:\tAdd or update documentation' }, { value: ':lipstick: style', name: '💄 style:\tAdd or update styles, ui or ux', }, { value: ':recycle: refactor', name: '♻️ refactor:\tCode change that neither fixes a bug nor adds a feature', }, { value: ':zap: perf', name: '⚡️ perf:\tCode change that improves performance', }, { value: ':white_check_mark: test', name: '✅ test:\tAdding tests cases', }, { value: ':truck: chore', name: '🚚 chore:\tChanges to the build process or auxiliary tools\n\t\tand libraries such as documentation generation', }, { value: ':rewind: revert', name: '⏪️ revert:\tRevert to a commit' }, { value: ':construction: wip', name: '🚧 wip:\tWork in progress' }, { value: ':construction_worker: build', name: '👷 build:\tAdd or update regards to build process', }, { value: ':green_heart: ci', name: '💚 ci:\tAdd or update regards to build process', }, ],
scopes: [ { name: 'apps/api' }, { name: 'apps/web' }, { name: 'pkg/api' }, { name: "pkg/eslint" }, { name: "pkg/rslib" }, { name: "pkg/shadcn" }, { name: "pkg/prisma" }, { name: "docker" }, { name: "pipeline" }, { name: "general" }, ],
usePreparedCommit: false, // to re-use commit from ./.git/COMMIT_EDITMSG allowTicketNumber: false, isTicketNumberRequired: false, ticketNumberPrefix: 'TICKET-', ticketNumberRegExp: '\\d{1,5}',
// override the messages, defaults are as follows messages: { type: "Select the type of change that you're committing:", scope: '\nDenote the SCOPE of this change (optional):', // used if allowCustomScopes is true customScope: 'Denote the SCOPE of this change:', subject: 'Write a SHORT, IMPERATIVE tense description of the change:\n', body: 'Provide a LONGER description of the change (optional). Use "|" to break new line:\n', breaking: 'List any BREAKING CHANGES (optional):\n', footer: 'List any ISSUES CLOSED by this change (optional). E.g.: #31, #34:\n', confirmCommit: 'Are you sure you want to proceed with the commit above?', },
allowCustomScopes: true, allowBreakingChanges: ['feat', 'fix'], // skip any questions you want // skipQuestions: ['scope', 'body'],
// limit subject length subjectLimit: 100, // breaklineChar: '|', // It is supported for fields body and footer. // footerPrefix : 'ISSUES CLOSED:' // askForBreakingChangeFirst : true, // default is false};Setup lint-staged
การใช้ lint-staged ก็ไม่ยาก
เราแค่ติดตั้ง lint-staged ไว้ใน workspace level
pnpm add -D lint-staged -wจากนั้น
เราจะต้องสร้าง lint staged config file (.lintstagedrc.json ) ในทุกๆ apps ในทุกๆ packages ที่เราต้องการจะสั่ง eslint
ในที่นี้ผมต้องการจะสั่ง eslint ในทุกๆ apps แต่ไม่ใช่ในทุกๆ packages
ตามนี้
- apps/api
- apps/web
- packages/prisma
- pacakges/api
- packages/shadcn
ฉนั้น lint-staged config จะต้องมีอยู่ในทุกๆ apps และ packages เหล่านั้น
ไฟล์ lint-staged config ของผมเหมือนกันหมดในทุกๆที่เลย แบบนี้
.lintstagedrc.json
{ "*.{js,ts,jsx,tsx}": "eslint --max-warnings 0"}จากนี้ก็แค่ใส่ไฟล์นี้เข้าไปในทุกๆ apps ทุกๆ packages
.6 collapsed lines
├── .gitignore├── .husky│ ├── commit-msg│ ├── install.mjs│ └── pre-commit├── .npmrc├── apps│ ├── api│ │ ├── .lintstagedrc.json6 collapsed lines
│ │ ├── dist│ │ ├── eslint.config.ts│ │ ├── package.json│ │ ├── rslib.config.ts│ │ ├── src│ │ └── tsconfig.json│ └── web│ ├── .lintstagedrc.json15 collapsed lines
│ ├── .gitignore│ ├── .prettierignore│ ├── .turbo│ ├── .vscode│ ├── app│ ├── app.config.ts│ ├── package.json│ ├── postcss.config.mjs│ ├── public│ ├── README.md│ └── tsconfig.json├── commitlint.config.cjs├── cz.config.cjs├── package.json├── packages│ ├── api│ │ ├── .lintstagedrc.json15 collapsed lines
│ │ ├── .gitignore│ │ ├── dist│ │ ├── package.json│ │ ├── README.md│ │ ├── rslib.config.ts│ │ ├── src│ │ └── tsconfig.json│ ├── eslint-config│ │ ├── antfu.ts│ │ ├── base.js│ │ ├── eslint.config.ts│ │ ├── next.js│ │ ├── package.json│ │ ├── react-internal.js│ │ └── README.md│ ├── prisma│ │ ├── .lintstagedrc.json14 collapsed lines
│ │ ├── .env│ │ ├── .gitignore│ │ ├── dist│ │ ├── eslint.config.ts│ │ ├── package.json│ │ ├── prisma│ │ ├── rslib.config.ts│ │ ├── src│ │ └── tsconfig.json│ ├── rslib-config│ │ ├── app.config.ts│ │ ├── eslint.config.ts│ │ ├── lib.config.ts│ │ └── package.json│ ├── shadcn│ │ ├── .lintstagedrc.json23 collapsed lines
│ │ ├── .turbo│ │ ├── components.json│ │ ├── eslint.config.ts│ │ ├── package.json│ │ ├── postcss.config.mjs│ │ ├── src│ │ └── tsconfig.json│ ├── typescript-config│ │ ├── base.json│ │ ├── nextjs.json│ │ ├── package.json│ │ └── react-library.json│ └── ui│ ├── .turbo│ ├── eslint.config.ts│ ├── package.json│ ├── src│ ├── tsconfig.json│ └── turbo├── pnpm-lock.yaml├── pnpm-workspace.yaml├── README.md└── turbo.jsonทดลองใช้ lint-staged ดู
git add .pnpm lint-stagedผมได้ commit ไปก่อนที่จะติดตั้ง lint-staged
ในส่วนของผมจะได้แบบนี้
❯ pnpm lint-staged✔ Backed up original state in git stash (58f0e79)✔ Running tasks for staged files...✔ Applying modifications from tasks...✔ Cleaning up temporary files...Conclusion
เราได้ทำอะไรกันไปบ้าง
- สร้าง Turborepo เปล่าๆ แต่ก็ไม่ได้เปล่าๆเท่าไร มี Nextjs ติดมาด้วย 2 apps แต่ว่าลบทิ้งไป
- สร้าง configs ต่างๆที่สามารถใช้งานร่วมกันได้ทั้งใน apps และ packages เช่น
eslint-config,rslib-config - สร้าง package Hono api แล้วให้ logic ของ API มาอยู่ตรงนี้ให้หมด แล้วค่อยเอาไป run server ที่ apps/api อีกครั้งนึง
ทำให้เราสามารถใช้ Hono client ดึง data ที่ Frontend โดยมี Type support ทั้งหมด เป็น E2E type-safe - สร้าง apps/api แล้วเรียกใช้ package api อีกที เท่านี้เลย ง่ายมากๆตรงนี้
- สร้าง prisma package
- สร้าง apps/web โดยใช้ Tanstack start framework
- สร้าง shadcn package เพื่อทำ UI ให้ Web นำไปใช้อีกที ซึ่งในอนาคตถ้ามี Web ที่ 2 แล้วอยากใช้ UI ตรงนี้ด้วยก็ดึงไปใช้ได้เลย สะดวกมากๆ
ตรงนี้ผมแนะนำว่าถ้าเป็นไปให้ควรสร้าง pure components ไว้ในนี้จะดีกว่านะครับ เพื่อให้ง่ายตอนที่เอา components ไปใช้ในหลายๆที่
tutorial นี้มันยาวมากๆๆๆ ผมอยากให้เห็นภาพให้ได้มากที่สุด เลยพยายามยกตัวอย่างพร้อมพาทำทีละขั้นตอน
อยากให้คนที่ follow ตาม step-by-step ใช้งาน Turborepo ได้เข้าใจ
ยังไงถ้าตกหล่นตรงไหน DM มาบอกกันได้นะครับ ผมจะรีบแก้
ผมพยายามทำให้ละเอียดแล้ว ใช้เวลานานมากกว่าจะเขียนเสร็จ แต่ผมว่ามันน่าจะมีจุดที่พลาดอยู่หลายจุดแน่ๆ ต้องขออภัยด้วยนะครับ
ยังเหลืออีก 2 EPs นะครับ ผมจะพยายามหาเวลามาเขียนให้จบ
EP2 จะเขียนคำสั่งเพื่อเอา apps ของเราทั้ง api ทั้ง web มาทำเป็น Docker image นะครับ
EP3 จะเขียน pipeline ให้ build docker image ของ api และ web แล้ว push เข้า google registry นะครับ
Thank you 🙏🫰
ขอบคุณทุกคนที่อ่านมาถึงตรงนี้
ใน tutorial นี้ยังขาดการ setup Test ถ้าผมมีเวลาจะมาเขียนแยกเป็นอีก blog นึงละกันครับ นี่ก็เยอะมากเลย
ตัวอย่าง repo ที่เสร็จแล้ว อยู่ที่ my github
ขอให้มีความสุขกับการ coding นะครับ